Adobe Photoshop is the most renowned Photoshop editing software when it comes to the professional output of any sort of image. Let’s talk about the famous ways of color correction in Photoshop.
Color correction is very important to professional editors as it is crucial to various types of photo editing and processing. The editors have to give their best to get the best color correction in Adobe Photoshop. But for that, you need proper guidance and patience to master the art of color correction in Adobe Photoshop.
In this era of social media, E-Commerce and online business owners need to work with the product images to reach the maximum goals in their respective businesses. So, proper color correction is very important for them in any circumstances.
Let’s devise the color correction into three parts, basic, intermediate, and advanced technique. Let’s talk about this issue in this article.
Basic technique: it’s the easiest technique for color correction in Adobe Photoshop. First, Open either the Levels or the Curves adjustment layer (this technique is the same in both).
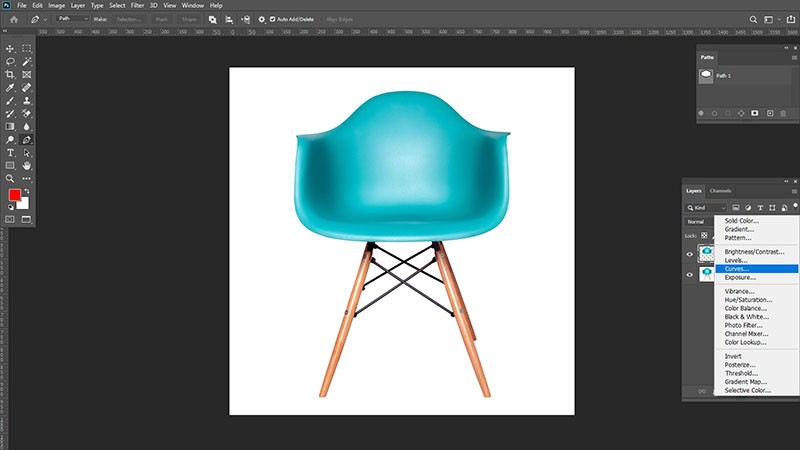
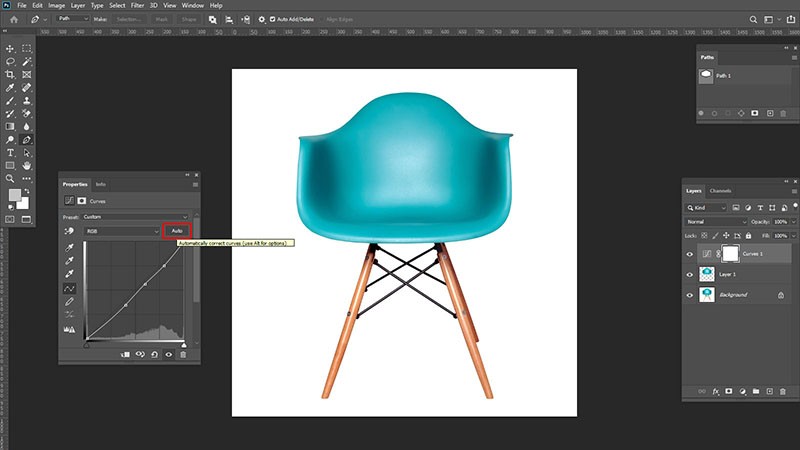
Then, click the AUTO button in the top right-hand corner of the histogram.
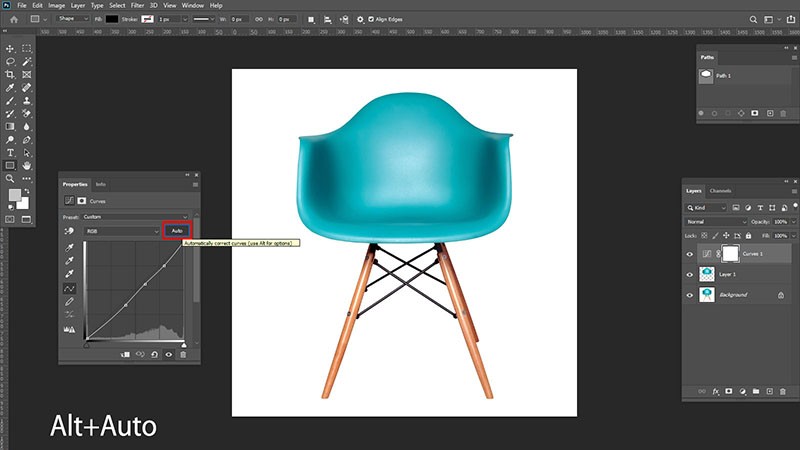
After that, click Alt or Option (Mac) and the AUTO button again to open the Auto Color Correction Options menu.
Later, Choose to Find Dark & Light Colors and check Snap Neutral Mid tones.
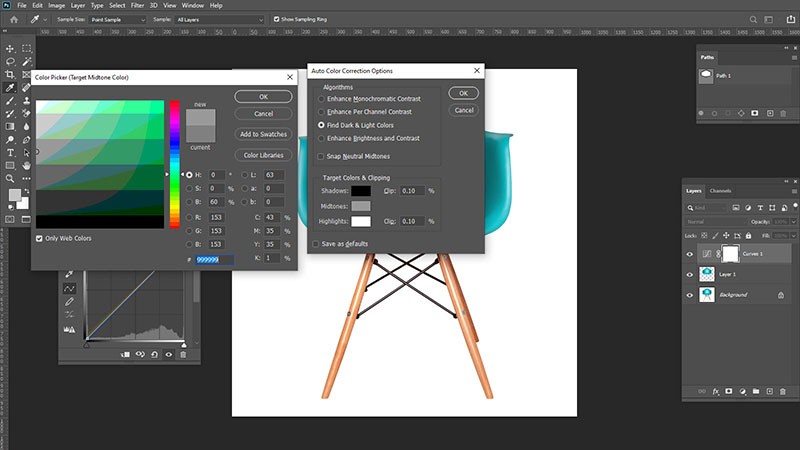
Last but not the least, Save as defaults and press OK.
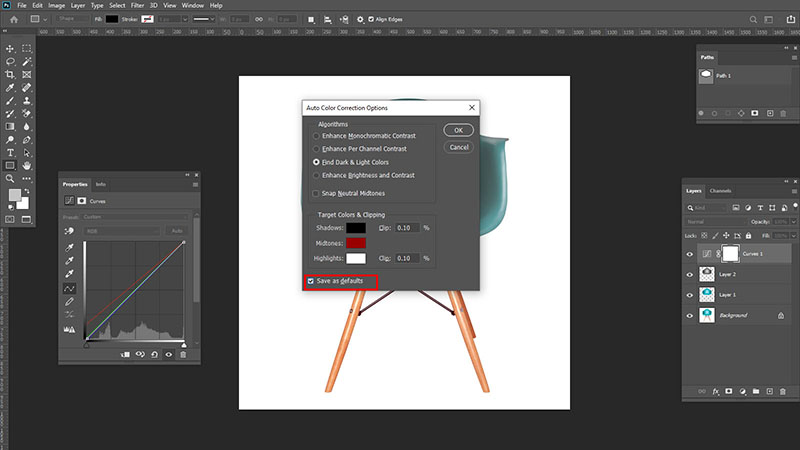
This allows you to color correct in just one click of the AUTO button from now on. Pretty easy isn’t it! So what are you waiting for? Just go for it.
Intermediate technique: well, it’s not that difficult if you know how to do it. First, create a new Curves adjustment layer. This is found in the Layers palette as seen in the following screenshot. Then, Double click on the black and white circle icon in the Layers palette. This will open up the Adjustments palette. You can see what this looks like below. After that, find the three dropper icons on the left side of the Adjustments palette.
These set the color points in your image to give you a quick white balance. On top is the black dropper, the middle is the gray dropper, and on the bottom is the white dropper. After that, select the black dropper and click somewhere on your image that you feel should be absolute black. For this, we picked the black part of the mouse sitting on the table.
The last step is, select the white dropper and pick somewhere in the image that represents pure white. We chose a piece of paper that is sitting on the table.
Advanced technique: It is mostly used by graphic designers all over time. It will give you more accurate and professional output without any doubt! First, open up the Color Sampler Tool located in the toolbar underneath the Eyedropper Tool. Or, use the shortcut Shift + / until you see the icon you see in this screenshot.
Then, Adjust the Sample Size, found in the tool settings. You can use as many sample pixels as you want, depending on how much of an area you want to sample.
If you’re not sure what to use, try using 3 by 3 Average until you are familiar with this technique. Now pick the colors to sample in your photo that best represents pure black, neutral gray, and pure white.
Our first color sample will be some of the darker shadows. When you pick one, you’ll notice a number is assigned to it. Since we chose 3 by 3 Average, the number one represents pure black, number two represents neutral gray, and number 3 represents pure white.
Note that you don’t necessarily have to choose the colors in the same order. After that, Photoshop will automatically open up the Info palette when you’re selecting the colors. This isn’t a step you need to perform, but it’s worth mentioning that this happens and it will be very important in helping you perform the white balance.
The key here is to notice the three numbers and their RGB (red, green, blue) values for each color. These will come into play later.
Ok now, Create a new Curves adjustment layer in the Layers palette. Then, Open the Adjustments palette and the Info palette. You’ll need to change the channel in the Adjustments palette. By default, the channels that display are RGB, but this intermediate technique for white balancing is done one channel at a time instead of all together.
Now, With the Red channel selected, if you hover over the image, you’ll notice there is a little circle that appears on the curve in the Adjustments palette. Hover your mouse over the first color you chose with the Color Sampler Tool and Ctrl + left click (Mac users Cmd + left click) on it.
This will add a new point on the curve in the Adjustments palette as seen in the screenshot below. If you can’t get a curve point created on pure black or pure white, it means the value you selected is too close to the default points Photoshop already has.
In this case, you can either pick something slightly further away (a little more toward gray) or use the existing points on the far left and far-right in the Adjustments palette. If possible, it’s recommended to pick something a little more toward gray, but depending on your photo, sometimes the best results require adjusting those original curve points.
With the point added, you can left-click and drag on the point itself in the Adjustments palette to control the color.
As you’re adjusting the curve point you’ll want to pay attention to the values for the color channel you’re working on in the Info palette. The two numbers are the original and edited numbers.
So now you have learned the different types of color correction techniques in Adobe Photoshop. Now, you can use it according to your need and merit without any doubt.