It looks like you are facing some trouble with your Photoshop. Hang in there. You are not alone! We have all faced performance issues even while working with regular-sized files. There are many ways you can customize the software setting for the type of work you do. Following these is not only going to make your work easy but also it will optimize your Photoshop’s performance. Let’s dig deep:
Check History and Cache
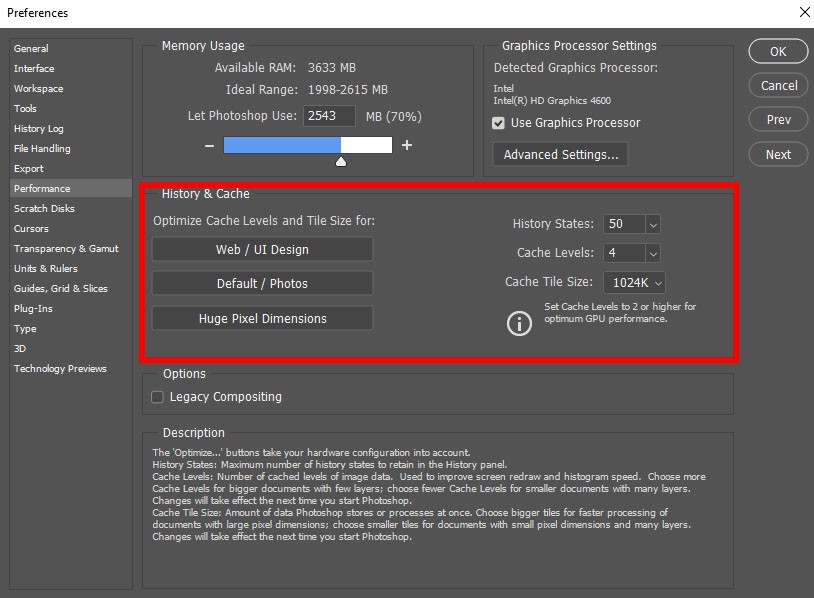
If you work for iPhone apps try using the Optimize Cache and Tile Size preset named Tall & Thin. This option understands your hardware configuration and seems to give a smooth performance for the small document sizes and several layers are used for editing and enhancing for a standard mobile UI design workflow.

Choosing Tall and Thin results in the best cache level for GPU performance and the cache tile size is set very low to optimize the small dimensions and multilayers of a mobile UI design document.

Be aware of a huge number of History / Undo states. If Photoshop seems slow after your adjustments, reduce history states and free up space. I prefer 12 or 16 states of undo history.
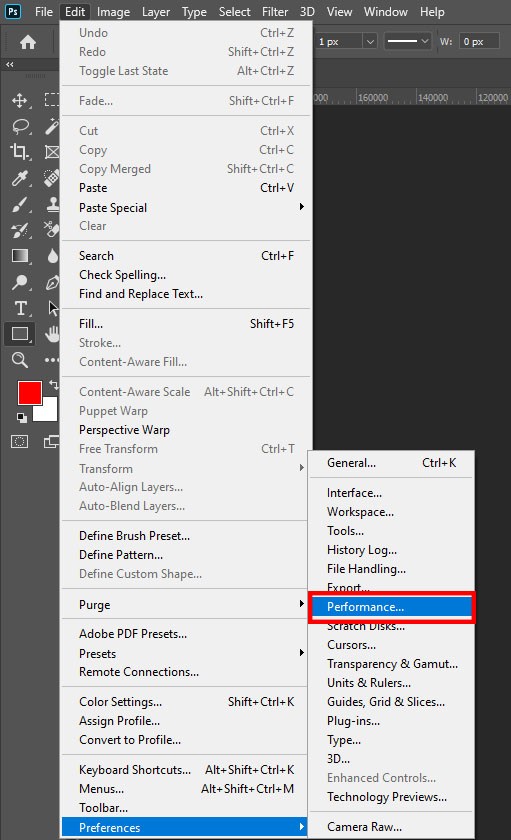
Open Photoshop → Preferences → Performance → History & Cache → “Tall and Thin”
Optimize GPU
To improve processing, you can adjust the GPU setup from Photoshop
preference setting. It gives a great extent of setup flexibility. There are Basic, Advanced and Normal performance models. If you are faced with responsiveness issues, screen redraw issues, or slow performance issues set your drawing mode to basic. This model uses the lowest GPU memory.
Open Photoshop → Preferences → Performance → Advanced Settings → “Basic”
Use Scratch Disk
A scratch disk can do the miracle for you. It gives your Photoshop a very strong performance boost. Set the disk at our fastest drive –ideally a high RPM internal or external drive which is different from your boot drive. Though you can use any drive with enough free space, using SSD drive will give the best outcome.
Open Photoshop → Preferences → Performance → Active Drive → “Checked”
Dial high on Memory Usage
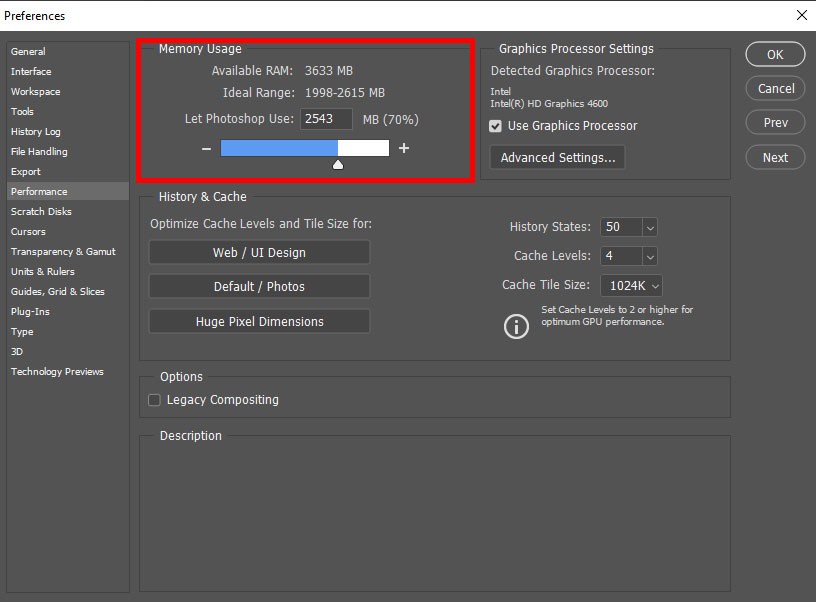
Set your RAM setting for Photoshop at the optimum level. If you have a lot of RAM, this is going to be easy. On Macbook Pro, the default setting gives a pretty great performance which allocates about 70% of RAM for Photoshop. Do not get overwhelmed with this. If you allocate the above-recommended range, many problems will start occurring. Also, you cannot access more than 3GB RAM on a 32 bit mode Photoshop.

Open Photoshop → Preferences → Performance → Memory Usage
Use 64-bit Architecture
Photoshop CS6 and above can run in only 64-bit mode, have hardware and an operating system that supports it. For big multilayered documents, this will give a great performance boost. This will also allow increased RAM allocation and improved image processing experience. When you start the software you can check which version it is, as it appears near to your application version number.
Open Photoshop → Photoshop → about Photoshop → “x64.”
Disable Thumbnail Display
You can quickly disengage system resources by turning off layer thumbnails, system resources are engaged for drawing and updating all thumbnail previews. This is one of the most practical ways to enhance performance quickly.
Note: this will make you miss the visual cues of thumbnails in the layer panel, but the improved performance makes it worth a try. Select ‘none’ in the Layers Panel Options dialog box to turn off the thumbnail display.
Open Photoshop → Layers Panel → Layers Panel Menu (dropdown) → Panel Options → “None.”
Adjust Automatic Recovery & Background Save options
You can minimize or completely omit auto-recovery of Photoshop files via Edit > Preferences > File Handling as shown below:
This ensures Photoshop doesn’t save as frequently and reduce the amount of intermittent slowdown of Photoshop.

Change File Compatibility Options
If an old version of Photoshop files has no use to you, you can disable compression of PSD and PSB files and swap the “Maximize PSD and PSD file compatibility” to “Ask”:
Find the setting at Edit > Preferences > File Handling.
Disable Font Preview
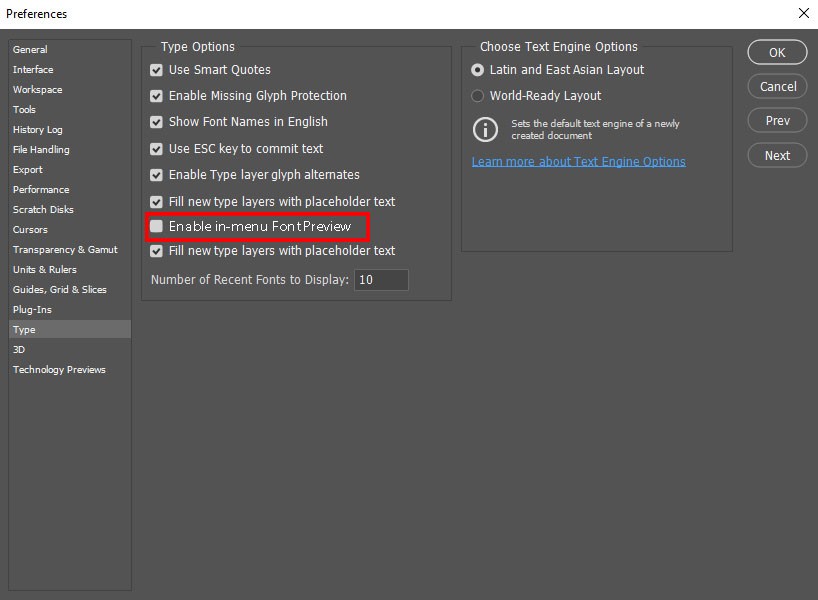
Every active font that you use on your device takes up system resources. Therefore, having many fonts activated can highly impact Photoshop performance. This action you will take outside Photoshop by using your preferred font management application. This way you can greatly boost Photoshop performance by de-activating unwanted fonts. Also, try turning of font preview. This will decrease system resources in Photoshop.
Open Photoshop → Type → Font Preview Size → “None” Enable in-menu Font Preview

Disable Animated Zoom and Flick Panning
There are two more settings to try for speeding things up. Both are placed at the General Preferences pane: disable Animated Zoom and disable Flick Panning to optimize performance.
Open Photoshop → Preferences → General → Animated Zoom & Enable Flick Panning → “Unchecked”
All these efforts will go in vain if you do not restart your Photoshop at the end. Ensure to restart Photoshop once you’ve made the tweaks. It needs the refresh for the performance changes to take effect. If you’re still facing performance problems after that, you can also try closing all other applications and just stick to a single Photoshop file to optimize performance. I am sure using a combination of these tricks will definitely smoothen your user experience with the software.
This is it! I hope this makes your image editing experience enjoyable.