Do you have any idea regarding refining edge? It is a tool in Adobe Photoshop that has some great features for tuning the selection within the image. Especially when we are dealing with the complex edge in the image, it becomes one of the vital instruments to work for. Frequently, we use this tool for different masking services. The new learners have struggled a lot to learn these services. In this tutorial, we will try to explain it step by step so that you catch it from the bottom. Let’s go for a detailed discussion on “How to Access Refine Edge in Photoshop CC 2018?”
While working on this topic, this is the very first question that will come to our mind. The select and mask workspaces replace the refine edge mask in the previous version of Photoshop. We know that they are offering the exact functionality in a streamlined way.
For finding the old refine edge, you need to go to the select option from the menu bar hold down the shift key while you are working on the select and mask. If you are running the upper version of Photoshop like Photoshop CC 2020 shift, select –mask does not work properly. We have to remind you that.
For making this experiment, we need an image with long hair which is not straight. Curling hair is our target for selection purposes. In this image, we do the selection by using the color range command. It will automatically select a portion of the image that consists of the same color. You can choose any image which has an edge and then start this work step by step.

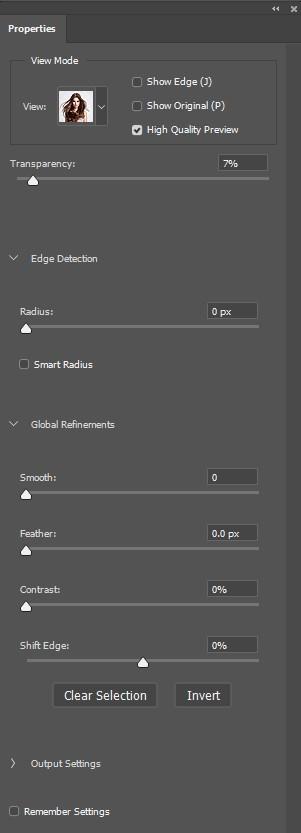
By the initial selection in progress, refine edge can be a secret trick. Now, the user needs to hold the shift key and from the menu bar and then press select and mask. Now, Photoshop will open up refine edge dialogue box just like Adobe pretended it anyway. Now we have to fill up the form and set up the key value here. There will be smooth, feather, contrast, and shift edge, etc. We need to put some value here and eventually make the refine edge perfect for the users.
For a demo value I can say smooth 10, feather 10.0, contrast 5, and finally, shift edge 5. That’s all put all the documents here and see the result here. This is the simple procedure to complete the refine edge command. Follow the guideline from top to bottom and you can easily perform refine edge masking to the images.

The refine edge tool has a variety of use in our day-to-day life. It can help us to optimize the expert work like hair masking, unwanted shape removing, beautify the current document, etc. Most of the time we use refine edge tools for hair and furs. We use this technique for complex images. By using a technique, we can simply beautify the images and eventually make them perfectly suitable for end-use. Without masking technique, it is quite hard to edit those images and its corners are not smooth and sometimes it contains varieties of colors. So ordinary clipping strategy will not work here. We need to implement the latest technique to solve this issue. In our real life, color masking and transparent masking are widely using among users. While we are thinking of eCommerce photo editing masking is one of the important things that we need to consider here.

In short, we can say that refine edge is the simple part of hair masking or any kind of masking technique. We need this service almost every day in our modern life. From this tutorial, you can learn the basics of image masking service and refine edge techniques.

If you do not understand any point do not hesitate to ask us. You can directly mail to us at info@clippingimages.com or put your comments below. Thanks a lot!