In this article, I will describe how to use feather selections with a quick mask for your image and how to make your desired image more alluring and more beautiful in front of viewers. Photo-shop helps to soften the edges with the help of feather selection. You can use the feather selection method where you will find the edges are very sharp.
There are so many people who use the feathering method directly from the menu bar directly beneath the select menu. When they want to soften the edges, they simply follow this command: pick out the select menu > choose “Modify” > choose “feather”. But feather commands contain a disadvantage. It does not allow us to preview what are actually doing with our photo. There are many other effective ways are available to feather selection. It is not exactly like feather command but you can work with this easily. It gives us the live preview option to see what we are doing with our photos and it is really helpful for us. Let’s create a vignette effect on our photo.
Step 1: Choose your desired photo: Open your photoshop. Select your desired image. Set the name of your selected image as “Photo”. Check the layers panel. You will view a layer which is named as “photo”. And this “photo layer” is situated upward of the “background-color” layer. The background color layer is covered with white color. This background color will work as a background for the vignette effect. Select the “Photo layer ” and start your work.

Step 2: Choose the elliptical marquee Tool: Go to the Tools panel and pick out the rectangle tool from there. The elliptical marquee tool is nested with the rectangle tool. To select the elliptical marquee tool, first press on the rectangle tool < go to down < pick out the elliptical marquee tool from the category.

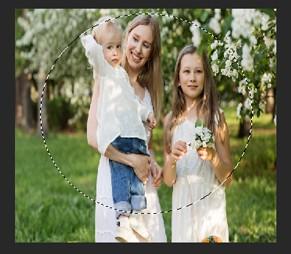
Step 3: Make a selection throughout the image: After selecting the elliptical marquee tool, pull out the elliptical selection line and make a selection line throughout the portions of your photo which you want to store. An elliptical line will be displayed. The elliptical Marquee tool creates solid edges. But we want to produce a soft edge on our photo. Because, we want to create a vignette effect on our photo, so we have to create soft edges. There are so many methods are available to create soft edges. One of the fastest ways is to use the feather command. Go to the top and choose the select menu from the menu bar < Choose the “Modify” option < choose “feather ”.

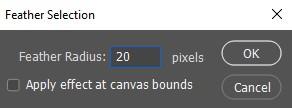
Step 4: Set the feather radius value: After clicking on the feather option, a feather dialog box will appear on the screen. You have to place the “Feather Radius” value (for example 20 px). Setting the “feather radius value” you can define the quantity of feathering we wish to use to the selection edges. You can set any value for the feather radius option. You have to make a guess and set the feather radius value. To close the feather radius dialog box from your screen, press the OK button. Now, observe your elliptical selection in your document. It looks almost similar as before. The selection line does not look dissimilar.
Step 5: The actual fact is that selection edges are looking softer than before. In spite of that, photoshop’s selection layout has no other technique of showing that the edges are feathered. The edges are still looking a little bit rough and solid. It happens because the selection line only displays near pixels which means are minimum of 50 % are selected. It means that any pixels on the inside of the selection lines are 50 selected. And selection line will not display the other things that are less than 50 % selected because they are not inside of the selection line. In fact, it is an advantage for us because it gives us a preview window. We can see how our feathered edges are looking. And it the high time to use the quick mask mode for the betterment of feather selection.
Step 6: Quick Mask Option: Recently, we have used the feather command but we want to undo it. What can we do to undo the feathering? It is really very easy. Use the shortcut command from your keyboard to undo the feathering. If you are using windows system then press on the CTRL+Z command. If you are using Mac then press on the COMMAND+Z from your keyboard. Go to the tools panel< press on the quick mask icon from there. By pressing on the quick mask icon, you can change your current model. If you do not want to stay in the quick mask mode then click again on the quick mask mode and it will return you from quick mask mode to normal mode. Also, there is some other way to open the quick mask mode. Press on the Q key from your keyboard to go to quick mask mode and press again on the Q key to return back to normal state.

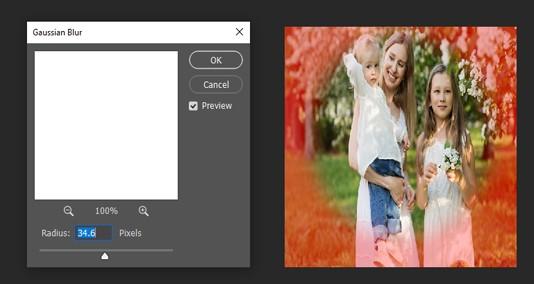
Step 7: When quick mask mode is selected, the selection line will be replaced by a red surface. This red surface displays those sections which are secured. For better understanding, we can say that the red surface displays those sections which are not in the selection line. How can we understand which parts are selected There are some sections that are completely clear to see and those parts are not covered by the red overlay. Selected portions are not covered by a red surface. Always select the part which is the center of the attention of your image.

Quick mask mode not only allows us to view the selections but also allows us to modify and edit selections in many ways which are really impossible with the standard selection line. You can apply any photo shop’s filter on the overlay. But the edges are still looking rough. We have to soften them. You can soften them with the help of the Gaussian Blur filter. Go to the top < select the filter menu < Choose “Blur” < Choose Gaussian Blur option.
Step 8: After clicking on the Gaussian blur option, the Gaussian blur dialog box will be opened. Set the radius value using the slider. Observe your document and pull out the slider on the right side. Check how it looks when you are pulling out the slider. When you will pull the slider, you will be able to see that the edges are getting softer than before. The more you pull the slider into the right side, the more you will create a fuzzy effect and edges will be softer. The edges will look very soft. See your document and adjust the radius slider as per your requirements. When you have set everything perfectly and you are satisfied with the appearance, press the OK button to close the Gaussian blur dialog box. Now the edges look softer than before. Return back to your normal mode. To turn off the quick mask mode, press on the quick mask symbol or Q key from your keyboard and return back to normal mode. It presents the standard selection line and it grants us no clue that we have feathered the selection using quick mask mode.
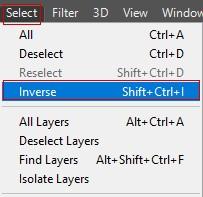
Step 9: If you think that you have chosen the incorrect part of your image and you want to select the main part of your image, then you can alter the selected area. If you want to get the main item of your picture, you have to invert the selection first. Go to the top < choose the Select menu < pick out inverse option from there.
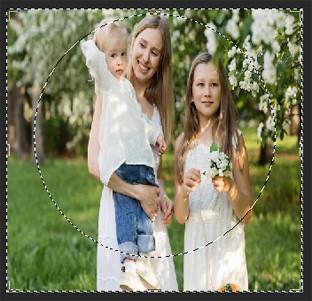
Step 10: Now erase the area that is outside of the selection. Press on the backspace (for windows) or press on the Delete (mac) to erase the area. Use this shortcut command to detach the selection layout from your document. Press on the CTRL+D (for windows) or COMMAND + D (for mac) to easily detach the selection layout. Edges are looking smooth and the selected area looks perfect.
