Dive into the realm of pixel-perfect precision with Smart Sharpen in Photoshop! Unleashing the full potential of your images, this tool is the secret weapon for achieving unparalleled sharpness. In a world where clarity is paramount, Smart Sharpen stands out, offering control and finesse like never before. Whether you’re a seasoned photographer or a design enthusiast, join us on this journey to unlock the art of the best sharpening in Photoshop.
We’ll unravel the techniques and insights that make Smart Sharpen a game-changer, ensuring your visuals captivate with razor-sharp brilliance. Ready to sharpen your skills and images? Let’s get started!
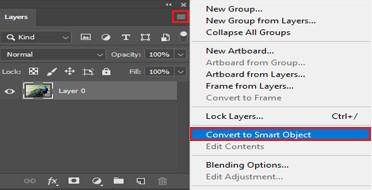
Smart Sharpen can be applied as a static filter, yet it’s smarter to apply it as a brilliant channel. This keeps the channel settings editable, and makes changing the channel’s mixing alternatives simpler. To apply Smart Sharpen as a brilliant channel, first proselyte your picture layer into a keen item. In the Layers board, my picture shows up on the Background layer. To change the layer over to a savvy object, click the menu symbol in the upper right of the Layers board.

And afterward pick Convert to Smart Object from the menu.
To apply Smart Sharpen, go up to the Filter menu in the Menu Bar, pick Sharpen, and afterward pick Smart Sharpen.
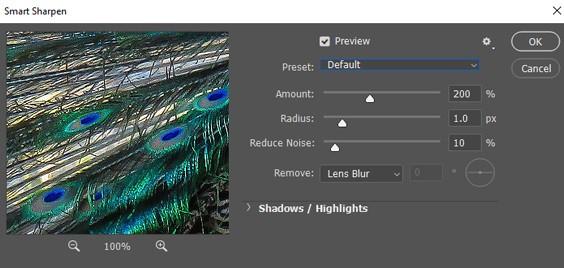
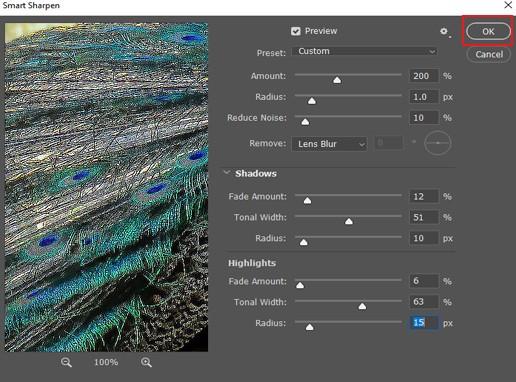
One of the main enormous benefits that Smart Sharpen has over Unsharp Mask is that the discourse box can be resized to make the review window a lot greater. To resize it, snap and drag the sides or corners of the exchange box outward.
Then, at that point whenever you’ve resized the exchange box, snap and drag inside the see window to fixate the review regarding your matter.
Another large benefit with Smart Sharpen is that it can distinguish edges, very much like the High Pass channel which I cover in a different instructional exercise. An edge is a region with an unexpected, sudden change in splendor between adjoining pixels. In any case, for Smart Sharpen to identify edges, the Remove choice should be set to Lens Blur.
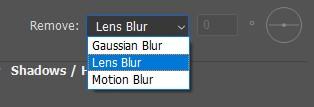
The two different decisions here are Gaussian Blur and Motion Blur. Gaussian Blur makes Smart Sharpen act precisely like Unsharp Mask, with no edge location capacity. Furthermore, Motion Blur is for eliminating obscure brought about by your subject moving or by camera shake.
For most pictures, you’ll need to ensure that Remove is set to Lens Blur before you proceed.
Picture sharpening is connected to extending contrast along edges, making the light side lighter and the obfuscated side hazier. The more grounded the edge contrast, the more sharpened the image looks. Additionally, really like with Unsharp Mask, Smart Sharpen uses an Amount slider to control the proportion of separation.

The Radius esteem in the Smart Sharpen exchange box controls the thickness of the edges, by setting the quantity of pixels expanding outward from an edge that ought to be viewed as a feature of the edge. Span immensely affects honing on the grounds that thicker edges make the expanded difference from the Amount setting more self-evident. So the two choices, Amount and Radius, work inseparably.

The default Radius worth of 1 pixel implies that the Amount of esteem is influencing just a solitary pixel on one or the other side (one pixel on the light side of the edge and one on the clouded side). Yet, as we increment the Radius, a more extensive and more extensive region is influenced.
In Photoshop CC, Adobe added a Reduce Noise highlight to Smart Sharpen. The issue with clamor is that it makes the very abrupt change in splendor between adjoining pixels that Photoshop searches for when recognizing edges. So the clamor gets honed alongside all the other things.

You can diminish the commotion utilizing the Reduce Noise slider. Be that as it may, on the off chance that you attempt to eliminate all the clamor, you’ll smooth out an excess of detail. So all things considered, drag the slider to one side until the picture looks cleaner and the commotion is less diverting. The default worth of 10% is frequently all you need:
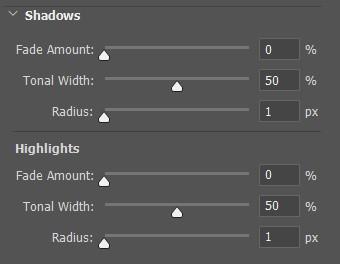
Now, the primary honing impact is finished. Yet, there’s one more potential issue we can fix with Smart Sharpen, and it’s one more benefit that Smart Sharpen has over Unsharp Mask. Contingent upon your picture and the measure of edge contrast you’ve added, honing can now and again prompt sections in the features and shadows, where the most brilliant edge pixels are smothered to unadulterated white and the haziest edge pixels are squashed to unadulterated dark.
At the point when you’re prepared to apply your honing settings, click OK to close the Smart Sharpen discourse box
Lastly, regardless of whether we’re sharpening a picture with Smart Sharpen or Unsharp Mask, the last advance is consistently something very similar. We need to stay away from shading relics in the honed form by changing the channel’s mix mode. Back in the Layers board, Smart Sharpen shows up as a savvy channel underneath the picture. Open the channel’s mixing alternatives by double tapping on the Blending Options symbol.
Also, in the Blending Options exchange box, change the mix mode from Normal to Luminosity. This keeps Smart Sharpen from honing the shading by restricting its impact to simply the splendor of the pixels.

On the off chance that you find that your honing looks excessively solid, you can diminish it here by bringing down the Opacity of the Smart Sharpen channel. In any case, I’ll leave mine at 100%. Snap OK when you’re set to close the discourse box.
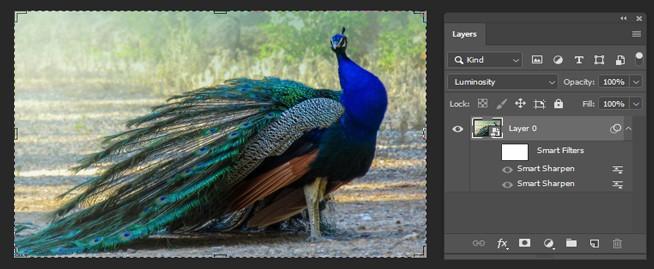
Changing the Smart Sharpen mix mode to Luminosity.
To analyze the first and sharpened variant of your picture, switch Smart Sharpen on and off by tapping the smart channel visibility icon in the Layers panel.


