Photoshop is an essential tool for both professional photographers and graphic designers, offering a wide range of advanced editing features. Among these features, the Gaussian blur effect stands out as one of the most popular and versatile tools for creating a smooth and dreamy aesthetic in photos and designs. Whether you want to soften the harsh edges of a photograph, add depth of field to an image, or simply enhance its overall visual appeal, gaussian blur is the go-to effect.
However, for beginners, navigating through the vast array of options and techniques in Photoshop can be overwhelming. That’s why in this article, we will provide you with a comprehensive guide on how to add Gaussian blur in Photoshop, step by step.
By the end of this tutorial, you will not only understand the basic principles of this effect but also learn some useful tips and tricks to take your editing skills to the next level. So, let’s dive into the world of Gaussian blur and discover the endless possibilities it offers for creating stunning visuals.
Gaussian blur is a powerful and versatile tool that is widely used in image editing software like Photoshop. It is a popular technique for creating a soft, dreamy effect in photographs, as well as for enhancing depth and focus in digital artwork.
By applying a Gaussian blur, you can easily soften the edges of an image, reduce noise, or create a sense of motion. This technique is particularly useful for portrait retouching, where it can help to smooth skin imperfections while maintaining a natural appearance. With its adjustable intensity and radius parameters, Gaussian blur allows for precise control and fine-tuning of the desired effect.
Whether you are a professional photographer or a digital artist, mastering the art of adding Gaussian blur in Photoshop can greatly enhance your creative capabilities and produce stunning visual results.
To create soft, dreamy effects in your photographs or digital artwork, utilizing the Gaussian blur tool in Photoshop is an excellent choice. This technique allows you to achieve a gentle and ethereal look by subtly blurring specific areas of your image. By strategically applying the Gaussian blur, you can soften harsh lines, add a touch of romanticism, or create a dream-like atmosphere.
This effect works wonders for wedding and portrait photography, as well as for enhancing the overall mood and ambiance of landscape or still-life images. With the ability to adjust the radius and intensity of the blur, you have full control over the level of softness and the desired outcome. Incorporating this technique into your editing process will elevate your visuals and captivate your audience with its mesmerizing and enchanting results.
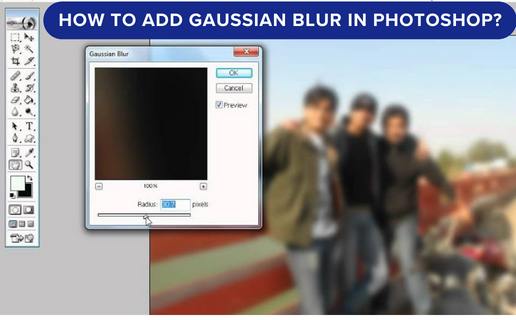
Blurring images in Photoshop using the Gaussian blur tool is a simple and effective process that can add depth and visual interest to your photographs or digital artwork. Begin by opening your desired image in Photoshop and selecting the specific layer or area you wish to blur.
Next, navigate to the “Filter” menu and choose “Blur” followed by “Gaussian Blur.” A dialog box will appear, allowing you to adjust the radius of the blur effect. Start with a low radius and gradually increase it until you achieve the desired level of blur.
Preview the changes in real time to ensure optimal results. Once you are satisfied with the blurring effect, click “OK” to apply it to your image. Remember to save your work regularly to preserve your edits. Incorporating these easy steps to add Gaussian blur in Photoshop will enhance your visuals and bring your creative vision to life.
The Gaussian blur tool in Photoshop is particularly effective when it comes to perfecting portraits and landscapes. When applied to portraits, the Gaussian blur can soften skin imperfections, creating a smoother and more polished look. This technique is especially useful for professional photographers and retouchers aiming to achieve a flawless complexion.
Additionally, when used on landscapes, the Gaussian blur can help create a sense of depth and atmosphere, enhancing the overall composition of the image. By selectively blurring certain elements, such as the background, foreground, or specific objects, you can create a visually stunning and captivating landscape that draws the viewer’s attention to the main focal point.
Whether you are retouching portraits or enhancing landscape images, mastering the art of incorporating Gaussian blur in Photoshop can elevate the visual impact of your work.
To achieve the desired effect when adding Gaussian blur in Photoshop, it is crucial to have control over the intensity and radius of the blur. Adjusting the blur intensity allows you to determine the degree to which the image is blurred, whether you prefer a subtle softening or a more pronounced blur effect. By increasing the intensity, you can create a dreamy and ethereal atmosphere, while reducing it can provide a more natural and subtle blurring effect.
Similarly, adjusting the blur radius allows you to specify the size of the blur area, ranging from a small localized blur to a wider, more encompassing blur. This level of precision enables you to maintain focus on specific elements of the image while blurring the surrounding areas, enhancing the overall composition, and drawing attention to the subject. Mastery of these adjustments in Gaussian blur will empower you to achieve the perfect balance of focus and blur, resulting in visually captivating and professionally polished images.
When working with Gaussian blur in Photoshop, one powerful technique to create visual impact is selectively blurring specific areas for focus. By strategically applying blur to certain elements while keeping others sharp, you can direct the viewer’s attention to the intended subject of your image.
Whether you want to highlight a person in a portrait, emphasize a product in a commercial shot, or create a sense of depth in a landscape, blurring specific areas can add depth and visual interest to your composition.
With precise control over the intensity and radius of the blur, you can achieve professional-looking results that enhance the overall aesthetics of your photos. Mastering this technique in Photoshop opens up a world of creative possibilities, allowing you to create visually compelling images that captivate viewers.
One of the key benefits of adding Gaussian blur in Photoshop is the ability to enhance depth and dimension in your images. By selectively applying a blur to certain areas, you can create a sense of distance and three-dimensionality. This technique is particularly useful in landscape photography, where you can blur the foreground or background elements to draw attention to the main subject and create a sense of depth in the image.
Additionally, adding a subtle blur to layers or objects in digital artwork can help to create a realistic and immersive visual experience. By experimenting with different blur intensities and blending modes, you can achieve a professional and polished result that adds depth and dimension to your photographs and designs.
Understanding the intricacies of Gaussian blur in Photoshop is essential for mastering the art of image editing. This powerful tool allows you to control the degree of blurriness in your images with precision and finesse. By experimenting with various settings such as radius and threshold, you can achieve different levels of blur to suit your creative vision.
Whether you are looking to create a dreamy and ethereal effect or enhance the focus on a specific area of an image, knowing how to add Gaussian blur in Photoshop opens up a world of possibilities. With practice and experimentation, you can develop a keen eye for using this technique effectively and elevate the overall quality of your digital artworks and photographs.
Gaussian blur is a photo editing technique used to soften images by averaging the colors of a pixel with its surrounding pixels. In Photoshop, it works by applying a mathematical formula that calculates the average color value of a pixel and its neighbors. This creates a smooth transition between colors, reducing noise and emphasizing details.
The blur radius determines the extent of blurring, with higher values producing more pronounced blur effects. Gaussian blur is commonly used for retouching portraits, creating a sense of depth, or simulating the out-of-focus background in photography.
Sure! To add Gaussian blur to an image in Photoshop, first open the image and duplicate the background layer. Then, go to Filter > Blur > Gaussian Blur. Adjust the radius to your desired level of blur and click OK.
You can also apply the blur non-destructively by converting the layer to a Smart Object before adding the blur. This allows you to go back and readjust the blur settings later if needed.
Yes, there are different ways to adjust the intensity of Gaussian blur in Photoshop. One way is to use the Gaussian Blur filter under the Filter menu, where you can adjust the radius to control the blur intensity.
Another way is to use the Blur tool in the toolbar, which allows you to manually apply blur to specific areas of an image.
Additionally, you can create a blur effect using layer masks and adjustment layers to have more control over the intensity and placement of the blur.
Gaussian blur can be used creatively in photo editing or graphic design projects to add depth of field, create dreamy or surreal effects, emphasize a focal point, or blend elements seamlessly.
By applying varying degrees of blur to different parts of an image, artists can manipulate focus and draw attention to specific areas. This technique can also be used to soften harsh edges, enhance textures, or simulate movement.
Overall, gaussian blur offers a versatile tool for enhancing visual appeal, guiding the viewer’s eye, and achieving unique artistic effects in design projects.
When adding Gaussian blur in Photoshop, consider adjusting the radius carefully to achieve the desired level of blurriness without losing too much detail.
Additionally, try applying the blur gradually by using multiple layers with different blur intensities and blending modes to create a more natural and realistic effect. Experiment with masking techniques to selectively apply blur to specific areas and always remember to preview your changes before finalizing to ensure the best results.
Lastly, utilize Photoshop’s Smart Filters feature to apply non-destructive blurring effects that can be easily adjusted or removed.
Adding Gaussian blur in Photoshop is a simple yet powerful tool that can enhance and elevate your images. By following the steps outlined in this tutorial, you can achieve professional-quality results that will impress and captivate your audience. With the ability to control the intensity and placement of the blur, this technique allows for endless creative possibilities and can be applied to a variety of projects.
Whether you are a beginner or an experienced user, mastering Gaussian blur in Photoshop is a valuable skill that will enhance your editing abilities and take your images to the next level. So go ahead and give it a try, and see the magic of Gaussian blur come to life in your designs.


