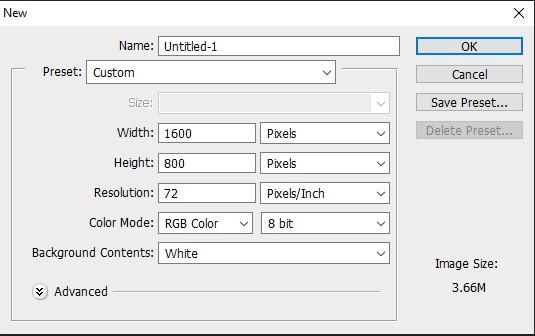
Step 1 : (Create a new record or document ) From the file menu, select the option which is named as New . A value box will be there . Set the height and width value. Set the resolution value. Hit OK . For photo-shop CC , you need to press the create button. For photo-shop CS6 , press the OK button. A new file will be appeared after setting all the values.
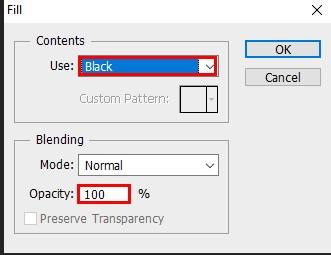
Step 2: Fill up the backdrop with black: As you are using the gold effect in your image, so it is very important to change the backdrop color to black. If you use white color then the whole image will look dull. Go to the option Edit < Click on the option which is named as Fill < A value box will have appeared < There will be an option which is content and it is a drop-down option < Set the content option into Black. The mode should be normal and Opacity should be 100 %. Hit OK. The background will be turned black.
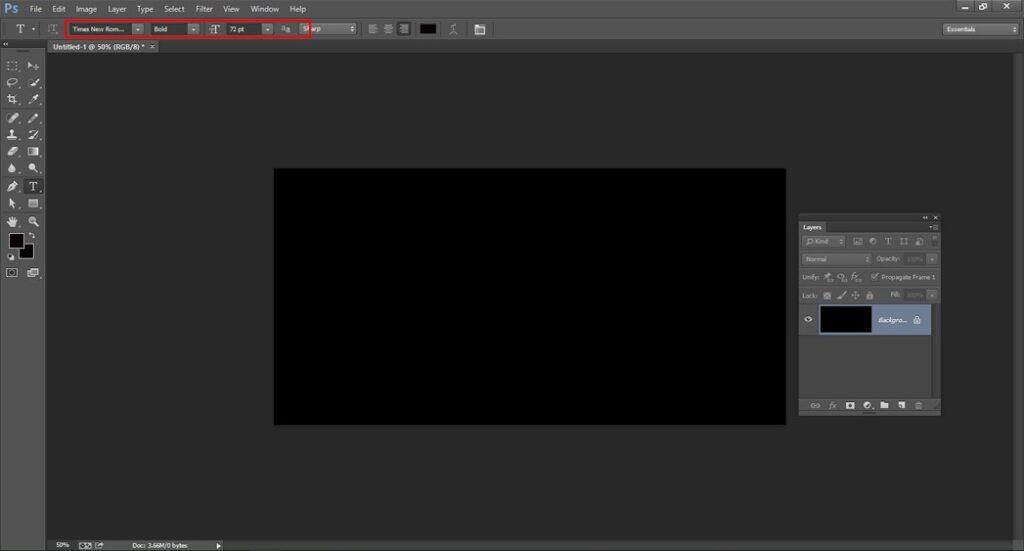
Step 3: Choose the Type tool and script style: From the menu bar, choose the type tool for inserting text. Now choose a font. Let’s use a simple font such as Times New Roman Bold. Give 72 pt type size. You can choose any style. There are no boundaries for this.
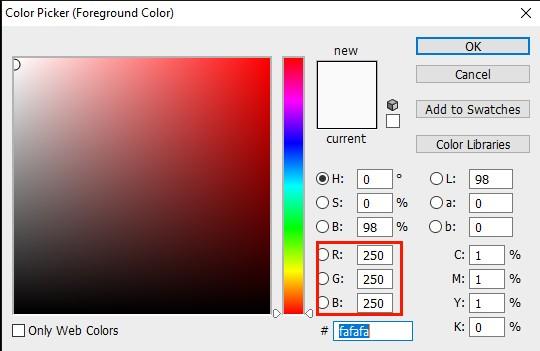
Step 4: Apply the color as white and insert your white: As the background is black, so white color is great to give focus on your text. If you use dark color then it will not be so attractive. From the option bar, hit on the color swatch option and select the white color. A color picker window will appear. Set each RGB value as 255 and hit the OK button.
Step 5: Insert your text: Now press on the inside of your document and type your text. You can type anything which you want. Let’s type Gold. The size of the text is smaller but you can resize it. Click on the tick mark option to get the text.

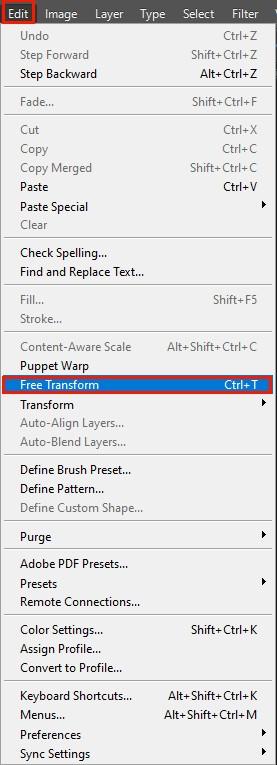
Step 6: Resize and relocate your text: If you wish to resize your text and If your text is not aligned and you want to set it in the center, then go to the option Edit < Choose the option named as free Transform. There will be an icon, you need to pull out any corners and manage it to increase your text size.
How can you resize text using photo-shop CC?

How can you resize text using Photoshop CS6?
How can you place the text in the middle of your document?

Step 7: Create a duplicate of that Script or type layer: Go to the layers panel < Create a copy of the text layer simply pulling it down on the option named as Add new layer symbol which is situated at the ground. A new copy layer (Gold Copy) will arrive at the top of the original layer.
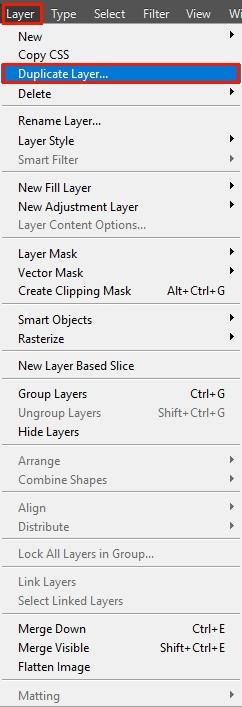
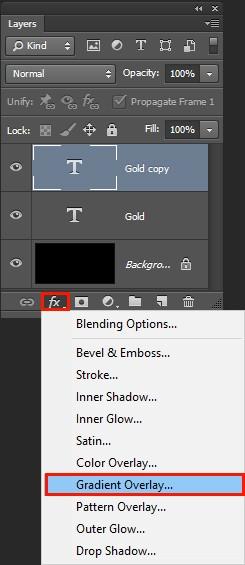
Step 8: Apply the Gradient Overlay Option: For applying the gold effect on your text, use the gradient overlay option. Click on the GOLD copy layer and ensure that it is selected < Press on the layers style symbol (Fx) < select the gradient overlay option.
Step 9: Make a gold gradient: After clicking on the gradient overlay option, a gradient overlay window will appear. At first, click on the Reset to default option. It will help to erase all the previous settings. Click on the option named Gradient. When you will hit on the gradient option, a box will appear. Press twice on the color stop which is situated beneath the left part of the gradient option. Then click on the color pattern. The Color picker box will appear. You can apply any kind of gold color to your text. Now place the RGB value. For R (set 247), for G (238) , For B(173). It will generate a dim light golden color. Click OK. Press twice on the color stop which is situated beneath the right part of the gradient option. Now place the RGB value. For R (set 193), for G (172) , For B(81). It will generate a dark golden color. Press OK.

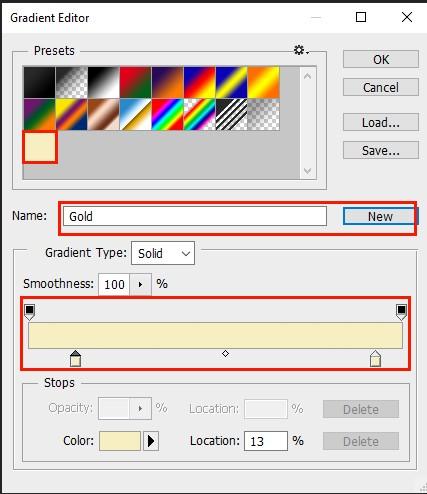
Step 10: Set the gold gradient option as Preset: From the gradient option, place a name that should be Gold and hit the button which is named as new. We will use this gold gradient later, that is why we have set it as preset. Photo-shop automatically includes a new thumbnail for the new preset. Press OK.
Step 11: Switch the gradient style as reflected: Go to the layer style menu < place the style as reflected. By doing this, the deep golden color will take place on the top and bottom of the script and the soft golden color will be in the middle of the text. It will create a great effect on the text.
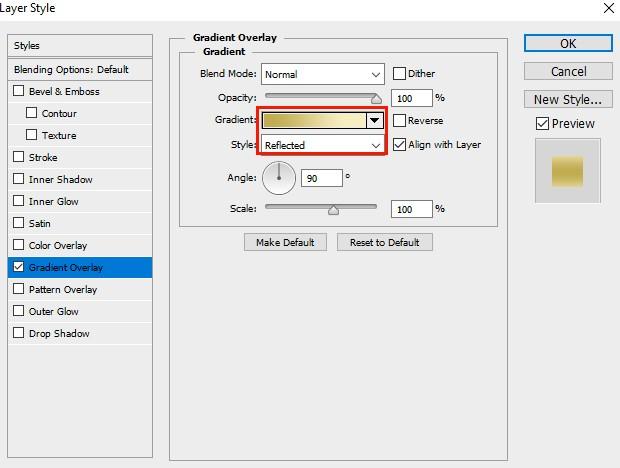
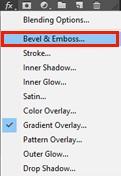
Step 12: Include the “Bevel and Emboss” option: From the layer style menu, select the bevel and emboss. And also click on the Reset and default option.
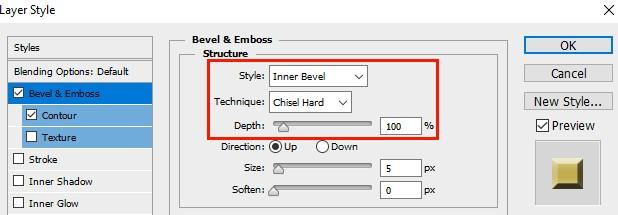
Step 13: Switch the technique to chisel hard: When you will include the Bevel and emboss option, a window will be there. An option will be there which is named as technique. Switch it into chisel hard.
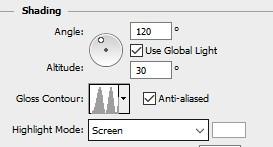
Step 14: A gloss contour option will be available in the shading option. Click on the gloss contour button and choose ring double. And also place the angle at 120 and enable the anti-aliased option. There will be other options named highlight mode, highlight mode opacity, shadow mode, opacity. Both opacity values should be 75 % for a perfect result.

Step 15: Increase the size value: In bevel and emboss layer style, Increase the size value to create the text more beautiful. Drag the sliders in to right side to increase the value.
Step 16: If you want to make the text more alluring, increase the depth value. Drag the sliders to the right side to add more value.
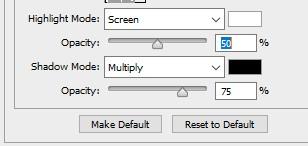
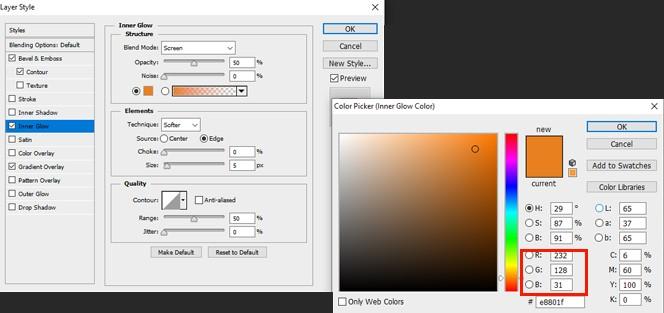
Step 17:Include inner glow effect: From the layers style, go to the left side and select the inner glow option. Press on the reset to default option. Place all the values. Switch the blend mode as multiply, opacity should be 50%. Alter the color of glow from color picker . Set the RGB value . If you want to use orange color then set RGB as (232, 128, 31). Extend the size of the glow. You should extend the size till the glow covers the whole texts . Click OK.
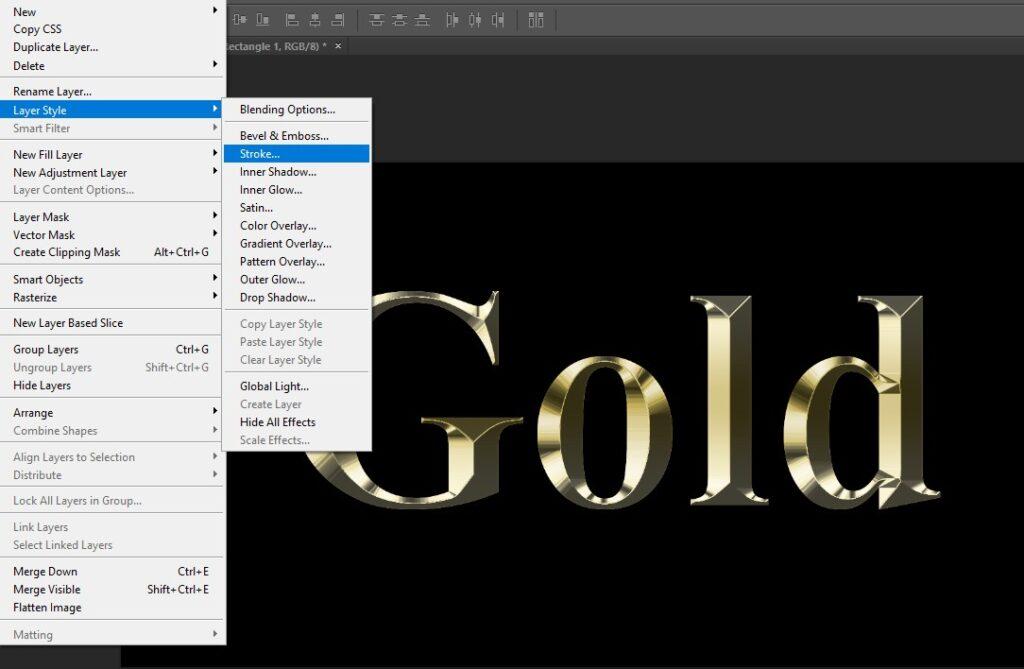
Step 18 : Choose the actual layer . And then hit on the layer style symbol < choose the option named as Stroke . Press on the reset to default.
Step 19 :Use gold gradient on stroke : There will be an option fill type . Select gradient from there . From the gradient value box , choose your gold gradient preset option.
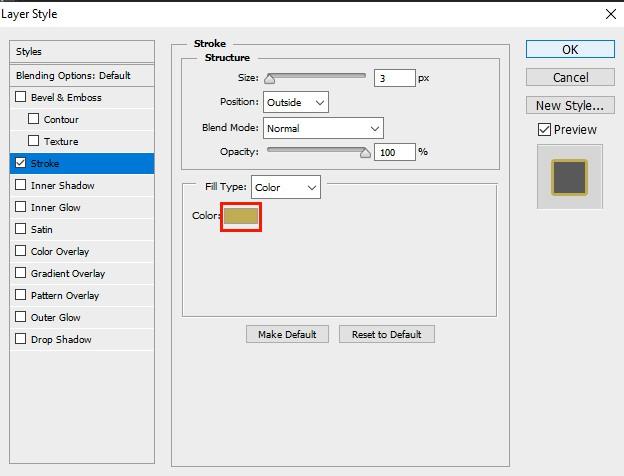
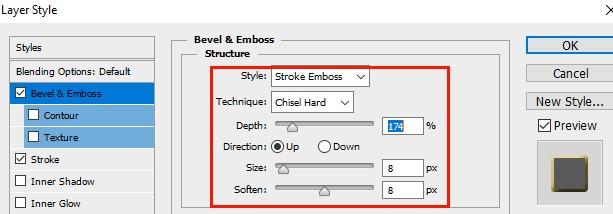
Step 20: From the stroke, manage all the options. Size, position, blend mode and many more option are there. Change the size. Set the position into outside. Now use the bevel and emboss to the stroke. From the layer style option, choose the bevel and emboss option. Click on the stroke and bevel and emboss option. You should not use the reset and default option here. Set the style as stroke emboss, switch the technique as chisel hard, set the size as 8 px. Press twice on the other bevel and emboss setting option : Set all the other options precisely.
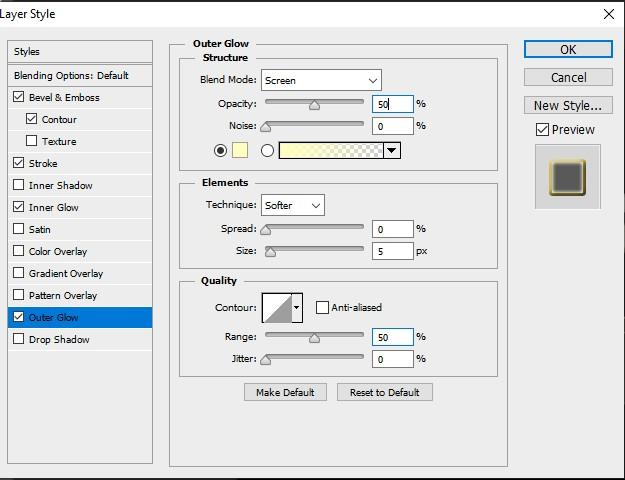
Step 21 : Enable the contour option. It will help to enhance the letter more. Use the outer glow option . Set all the settings. Set the opacity as 40 %. Set the RGB value . Set the size . Press OK .
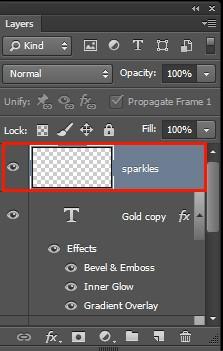
Step 22 : Choose the duplicate layer (Gold copy) : Choose the copy layer. Include a new layer. We are including a new layer to use sparkle effect on letters. Give a new name to that new layer. Set it as sparkles. Photo-shop includes a new layer which name is sparkle.
Step 23 :Now apply the brush : From the option bar , select brush tool. Choose the crosshatch 4 brush. But you can load this brush in photo-shop cc and photo-shop cs6 differently . In photo-shop CC , there will be a setting icon at the right side. Hit on that icon. Select legacy brushes.
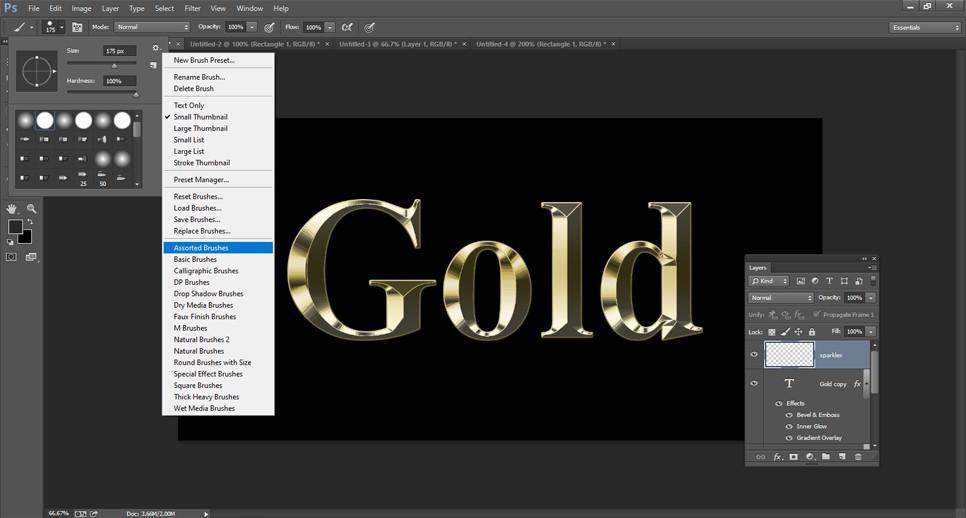
Press OK. Inside the legacy brush , there will be assorted brushes available. Choose crosshatch 4 brush from there . In photo-shop CS6, Hit the option icon , select the assorted brush. A message will be popped out . Choose append from there . Choose crosshatch 4 brush .Choose X 48 . Select a gold color for sparkling your text. Brush over the text. Make sure you have applied small amount of sparkling effect. Press OK. Gold effect is ready.