Do you have any idea of sharpening an image? We know that sharpening is all about catching the user’s attention properly and force them to attract to the image. Photoshop cannot go back to the shooting time and help you for a perfect focus. Keep a thing in your mind that, a blurry image will always be blurry and by using the tricks of Photoshop advanced feature we cannot change it. When we are talking of a macro shot, the maximum portion of the image is blurred out and the reason is shallow depth of field. Today our discussion topic is “Easy Image Sharpening with Unsharp mask in Photoshop” let’s go for a detailed discussion.
To begin this project our first task is to convert the image layer into a smart object. Our target is to apply the Unsharp mask as a profitable smart filter. Photoshop can implement a sharpening effect at a time for a single layer. Now, if you have multiple layers available then firstly you need to merge them up and then apply the effect where it is necessary.
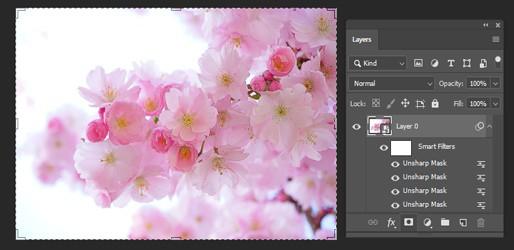
To convert the layer into a smart object you need to click the upper icon of the menu bar and here you will find out the option. Just right-click there and you will find out the option there. Now click Convert to smart object from there and it’s okay. Now you can notice the smart object icon at the right corner of the image.
Zoom to 100%
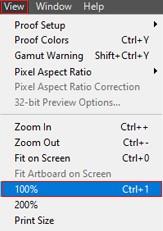
Our next target is to make it % so that it might look perfect. Experts say that by this way you can get an accurate view. In that case, you might need to visit the view menu and click zoom to 100%.

When you have completed the zooming process you have to press and hold the spacebar for temporary access. Now drag the center of your subject and release it when it is on the center.
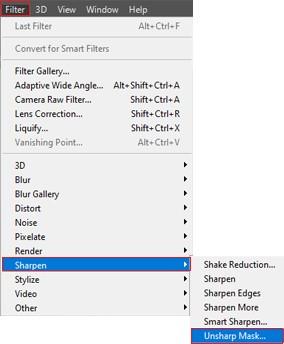
Now we can begin the Unsharp mask filter journey. It is a very easy task just you need to go through the Filter menu bar choose to sharpen from there and later on you need to choose Unsharp mask from the dropdown menu bar. When you will click it a dialogue box will pop up on the screen. Here you need to put three values of your masking filter and they are amount, radius, and threshold values.
To confirm this journey you can simply use the preview tool from there to check whether it is on center or not?
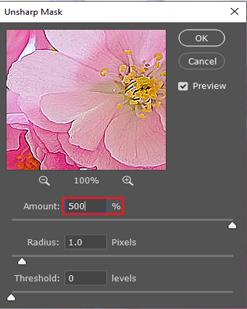
Our next target is to increase the edge contrast. To do that, from the window panel we have to slowly move it towards the right side. Sharpening means increasing contrast alongside the edges. In this process, we will make the light side a bit lighter and the dark side a bit darker. We are suggesting you increase the amount up to 500%. We do that for a testing purpose and in many cases, it can be a low or different amount.
When we are done with contrast our next mission is to change the radius slider. Naturally, the value will be 0. The radius value will control the thickness of the edge. It is a matter of experiment and you can change the value frequently and then check which one is perfect for you. If we like to sharpen a little bit then the radius value will be a bit high.

Brightness is estimated in levels going from 0 to 255. So for instance, a Threshold worth of 20 would imply that lone pixels in any event 20 splendor levels lighter or more obscure than the encompassing pixels would be honed. Any pixels under 20 levels more splendid or more obscure would stay dull.

I’ll expand the Threshold esteem from 0 to 10. The most effortless approach to change the Threshold esteem is by clicking inside the case to feature the current worth and afterward utilizing the Up or Down bolt keys on your console:
Lastly, we need to change the Unsharp mask blend mode to direct luminosity. Naturally, Unsharp Mask influences the brightness of pixels as well as their shading, and this can cause issues. Shadings may look oversaturated after honing, and a few pixels can even move to various tones.
This is a step-by-step tutorial and I hope you got the details from here. If you do not understand anything, please do not hesitate to put your comment below. Thanks a lot for being with us.


