Photoshop is a software through which we can do so many things . Without this software , many of us can not complete their work . In Photoshop , we do so many things to beautify our picture more and more . Sometimes we want to edit batch of images together in Photoshop . What should we do if we want to edit a batch of images at a time . Photoshop has every problem’s solution . We can edit a batch of images together in photo-shop withing a short period of time . In this article , I will describe how easily we can edit a batch a images in photo-shop. Lets get started.
We all know that “editing”a lengthy procedure . As it requires so many procedures, so it takes a lot of time . And if you have more than 50 images together and you want to edit all of them then it would be a very difficult thing. Also, it will take lot of time. Sometimes we want to edit all the pictures in the exactly same procedure . With the help of Photoshop , you can complete your work very quickly. Using Photoshop , you can record your action and you can store action . After then , you can use this action on your batch of images for completing the editing task.
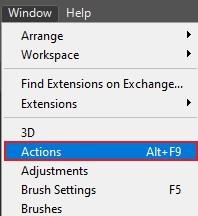
Step 1 : To start the action , just go to the window menu < then select the option named as “ Action ” . Go to the bottom of the action palette and press on the folder symbol to make a brand new set. Declare it as “Batch Actions”.
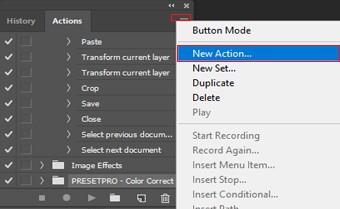
Step 2 : After doing this , go to the bottom of the action palette and press on the new action icon. New action icon is situated at the bottom of the action palette. Press on this icon to make a new action set.
Try to give the detailed name so that anyone can easily understand what the file contains . You can name it as “Auto contrast-Resize”.
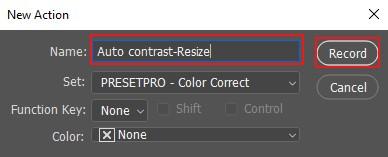
After completing this section , action will make a record . From now whatever you do will be considered as an action procedure. So , be very careful what you are doing at this point . Any small error can ruin your whole task. Now , start your editing task.
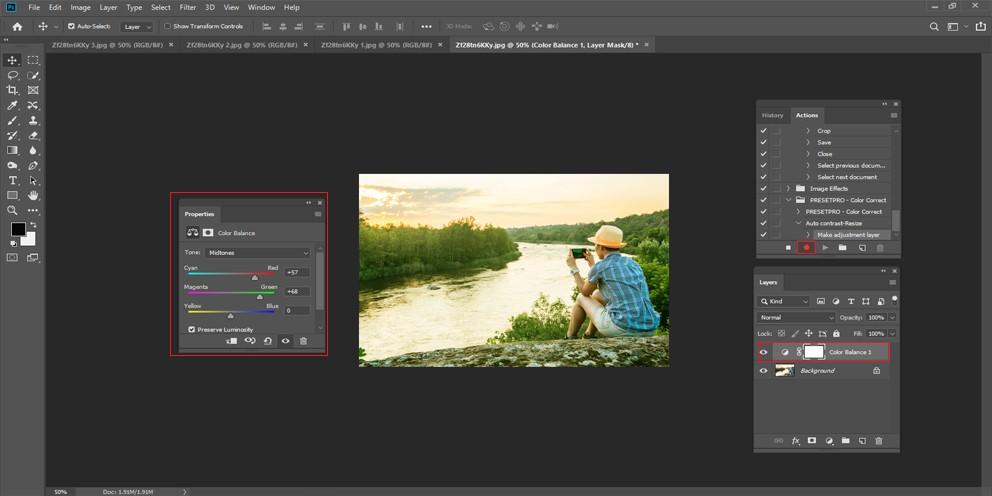
You can record any type of editing. For example , you can adjust and balance the contrast of the image , you can also re-scale all your images , you can re-scale them by setting the same height and width value. You can store all the changes you have made . When you have done everything as per your wish , you can see a new command recorded in the action palette.
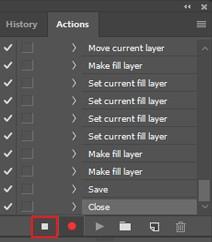
By extending this command , you can see all the contexts and all the environment you have used editing that image . When all the editing section is done , then turn off the action . To turn of the action , simply press on the “stop icon ” . You will find out the “stop icon” in the action palette.
How to apply the action to a batch : Before applying this action , try to keep all your images into one single folder . Ensure that you have kept all those images which you wanted to edit . Now use this batch to a folder that contains many images .
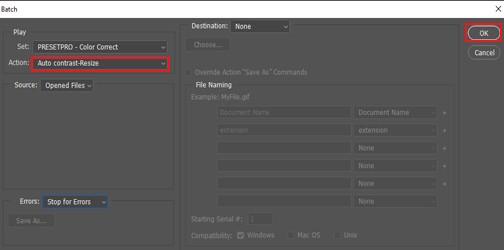
Step 1 : Select your desired file < then select “Automate ” < then select “Batch”.

Step 2 : A dialog will be appeared . Choose new action from the action category.
Step 3 : Now place the “source ” as “folder” . Then press on the “choose” button and select your desired folder which you have created for editing.
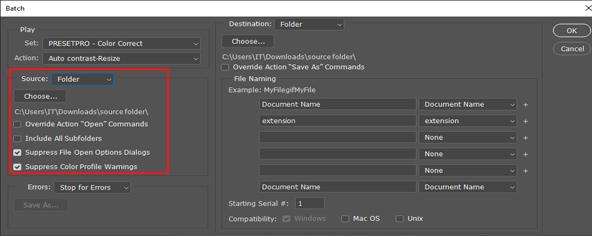
Now observe the below two options very carefully :
It will stop the warnings which can make an obstruction in batch processing.
Step 4 : In the portion beneath that , adjust the “destination” as “none”. By doing this , it will help you to apply the destinations which you have recorded some time ago in your action . Also , the photos will be stored in the same folder . Hereafter , if you wish to export your photos into a one single folder , then you can place the “Destination” option as “Folder”. After that you can select the destination folder.
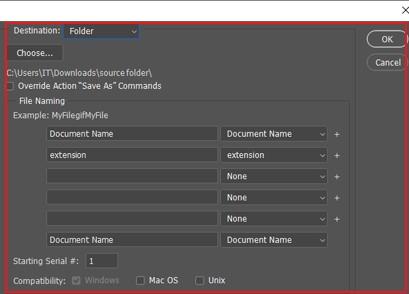
The moment you select “ None ” as your “destination”, every element will be turned out into gray.
Step 5 : After setting “none”as your “destination”, press on the OK button . Then Photoshop will start preparing all your images accurately.
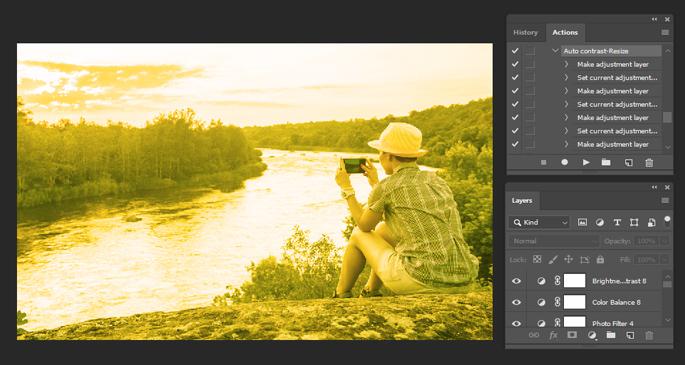
This is how you can edit a batch of images in Photoshop . And if you follow this procedure rather than editing all the images one by one , you can save your precious time also .
By saving this time , you can complete some important work also . You will get some relief also . Try this procedure for your work . It is really very useful because editing is the main part for any image .