On the off chance that you can’t make any layers utilizing marquee instruments or change colors utilizing the change tint immersion alternatives. Most likely all significant capacities are debilitated also. You may be seeing a lock symbol on your primary picture that is currently the foundation layer.
If you have issues altering a PNG record as referenced above, attempt these basic advances and you would do great in a matter of seconds.
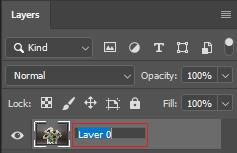
2. Duplicate the layer. Conceal the old layer. You currently have a high-level editable layer that is the only one apparent. This keeps up straightforwardness and the wide range of various highlights of the png without attempting to change over the picture.
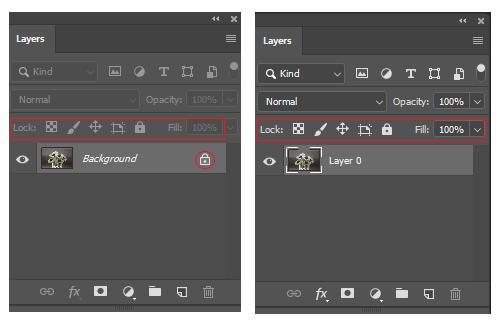
Unlocked layers guarantee that you don’t incidentally make changes to unique pictures or segments of your work. This is the reason any picture you open up is bolted consistently, named a “background layer.” Photoshop doesn’t need you to incidentally destroy the first photograph. That doesn’t imply that there aren’t approaches to change Unlocked layers.
Step 1
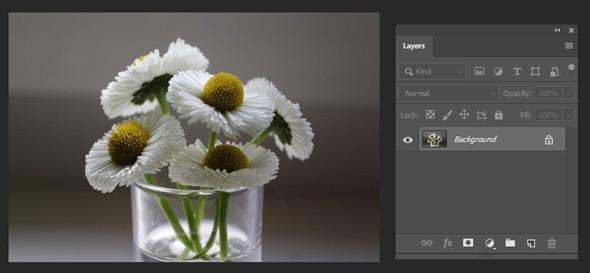
Open up your picture in Photoshop like typical.
There is no kind of progress or setting you can switch prior to opening a picture that opens the foundation layer. Simply open up the picture like ordinary.
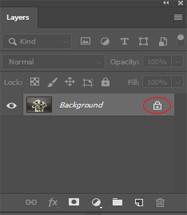
Snap-on the secured layer in the “Layers” palette. This is the long box on the right of your screen named layers. You’ll see each layer, beginning with “Foundation” – just as a little thumbnail of the picture. Close to Background, there ought to be a little latch symbol that reveals to you the layer is bolted.
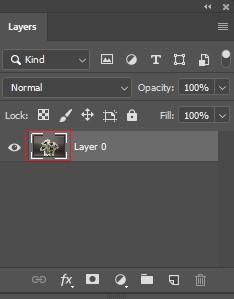
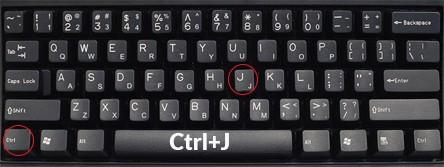
Snap-on the layer and press Ctrl/Cmd + J to copy an opened rendition of the foundation. This is maybe the most secure approach since it’s anything but an ideal unique duplicate in the event that anything turns out badly. For PC clients, press Ctrl+J when the foundation layer is featured. For Mac clients, it is Cmd+J. Your new layer will be opened and prepared to alter.
You can likewise tap on “Layers” from the top bar, then, at that point click “Copy Layer.”
Step 4
Double-tap on the foundation layer to rename and open it. Basically double tap on the title of the layer, “Foundation” and it’s anything but a little box to reproduce the layer. From this crate, you can:
Step 5
Snap-on “Layer” then, at that point “New Layer from Background” to make an opened substitution layer. In the top bar, click on “Layer”- – the right choice ought to be close to the top. Basic and simple, this additionally replaces your experience layer with a shiny new one. You won’t have an extra foundation, only one opened segment.
Troubleshooting Locked and Unlocked Layers
Step 1
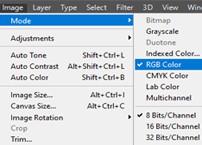
Quickly check the “Shading Settings” on the off chance that you can’t play with layers or add new ones. Some document designs, explicitly “Filed Color,” don’t have full similarity with Photoshop. Fortunately, they can be immediately changed, opening up full layer control.
Step 2
Re-lock a layer by tapping on the little latch in the range of the layers. The layer’s range has a few catches over the real layers. Tapping on the latch will bolt whatever layer (or layers, as you can Ctrl/Cmd-Click various on the double) you have featured. It will likewise open it. Note, notwithstanding, that this won’t ever deal with the background layer
Step 3
Use console alternate ways to bolt and open layers rapidly. The console easy route for locking layers is Ctrl/Cmd +/. This locks and opens every chosen layer.
Step 4
Unlock all layers, other than the foundation, with Ctrl/Cmd + Alt/Opt +/. This easy route opens everything ready for altering, other than the foundation. Note, nonetheless, that the foundation layer, the one bolted all along, won’t be influenced. The alternate routes, contingent upon your framework, are as per the following:
Step 5
Lock parts of a layer to permit complex altering. You can really bolt certain pieces of a layer for more exact altering. These catches are good close to the latch button and will show their names on the off chance that you float the mouse over them. Test:
The icon is a checkerboard. This makes it with the goal that you can’t alter anything straightforward in the layer, making no difference under the layer will be incidentally influenced.
The icon is a paintbrush. You can’t alter anything other than the straightforward pieces of the layer.
Icon is an intersection. Keeps you from moving the layer by any means, however you can in any case paint, re-shading, and add text.


