Photoshop is an amazing tool for many graphic design related works. Often we need to add text in an already existing file. Adding new text without disturbing the existing ones are relatively simple than you might expect. Let’s have a look:
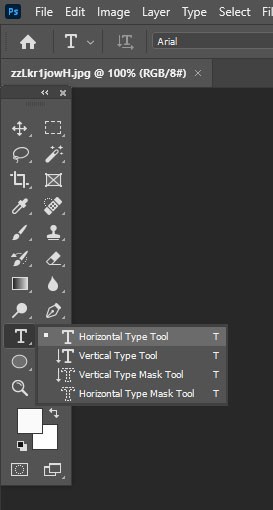
Step1: In your version of Photoshop, click on the Text Tool button from the menu or use the keyboard shortcut T. After that you will see a cursor.

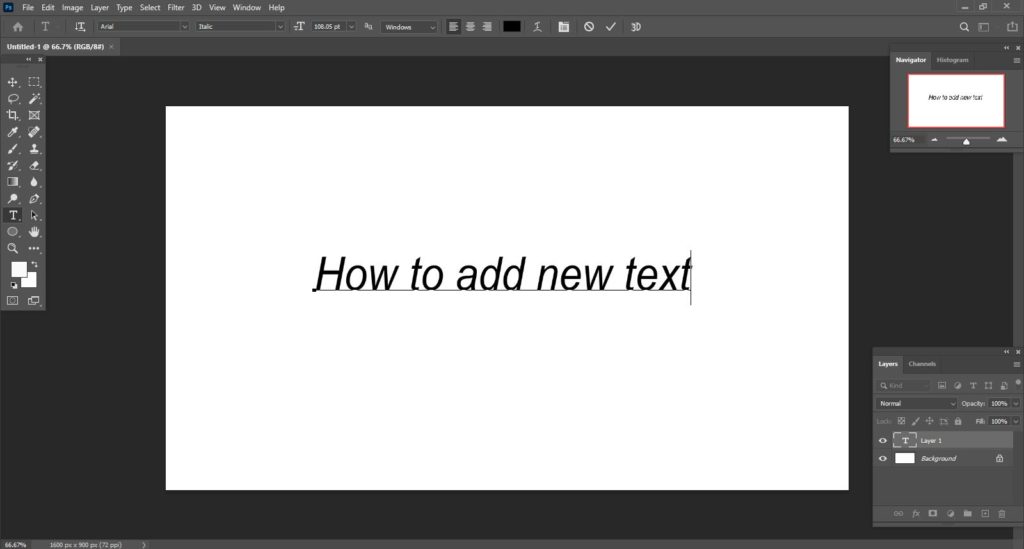
Step- 2: Now all you have got to do is Click on the canvas where you want your text to appear and start typing.You can alter the text box dimension by clicking and dragging any of the anchor points. Just hover over them and your cursor should turn into arrows.

Now things might not always be so simple. Although, changing text in Photoshop should be as simple as re-typing. It in fact is as long you understand layers. If the text is on its own layer, and was not rasterized (this a process that transforms text from vectors to pixels) it is easy. Working on saved file, might cause you some trouble in identifying text layers and their graphic state. In such case some knowledge of the layout of Adobe Photoshop CC will help you understand if you can easily change saved text.
Tip:
Flattened out text into other layers may not be easy to change in saved file, precisely if no Undo history is available.
Find out Text Layers
A simple way to change text in Photoshop is by typing over the previous text. However, the text should remain on a text layer. You can find this by identifying the layer in the lower right-hand box on your default screen layout.
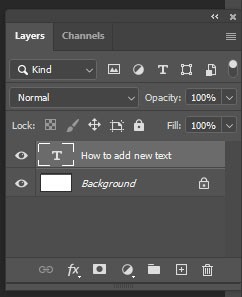
Search for tab that indicates, “Layers,” “Channels,” and “Paths,” selecting “Layers” if it’s not already the active tab. In the latest versions of Photoshop CC, you can select the text by clicking on it directly. Now, the appropriate layer is highlighted on the Layers list.

You will see that the highlighted layer displays a large T toward the left side of the layer highlight. This means that the text you’ve chosen is in vector form thus it is possible to directly edit this text.
On the other hand, if box to the left side of the layer highlight shows a smaller version of the entire image, it means the text is a pixel object and it can’t be edited using Photoshop’s text tools. Nevertheless, if it’s on a layer by itself, that layer can be deleted, or you can make it nonexistent by clicking on the eye icon on the left side of the layer highlight.
Manipulating Text Layers
After finding the vector form text, select one of the type tools from the tool bar on your left side in Photoshop’s default layout and chose Type tools by clicking the T box.
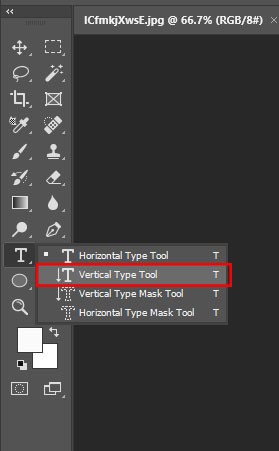
By default it is at the horizontal, you can right-click the T and select the vertical type tool also. Wit vertical option instead of entering text left-to-right the text appears from top to bottom.

After selecting the appropriate Text tool, highlight on the text you want to change by placing the cursor on it by clicking and dragging over the text. Now the selected text is highlighted, and you can type the new text. After this the selected text is omitted and the new text appears as you type.
After you have changed the text, click on the Commit button, a check mark icon to the top right of your Photoshop window. Alternatively, you can also simply select another tool, such as the Move tool at the top of the tool bar. This allows you to move your text layer into the precise position.
In case you have hidden or deleted a rasterized text layer, you can create a replacement text layer using this procedure mentioned above. Instead of highlighting text here you will simply place your cursor where you want your new text to show up.