In this article, you will learn how to change eye color in Photoshop using a Hue or Saturation adjustment layer. Hue or Saturation adjustment layer makes changing eye color very easy, fast and of course fun. You can change eye color in any color you need or you want. Because you will be working with an adjustment layer, you won’t make any permanent changes to the image.
So don’t worry about your original, unedited version. You will still have your original image with the original eye color, even after you are done. You can use Photoshop CC but the steps are fully compatible also with Photoshop CS6. Use any photo where you want to change the person’s eye color.
Step 1: Zoom in on the eyes
Before you begin, make it easier to see what you are doing by zooming in on the eyes. To do that select the Zoom Tool. You will find the option in the Toolbar. Then click several times on the area between the eyes to zoom in on both eyes at once. Now you need to center the eyes on your screen after you have zoomed in. Use the H key on your keyboard to switch to Photoshop’s Hand Tool then click and drag the photo into position.

Step 2: Select the lasso tool
Of course you want to change the eye color without affecting the rest of the photo. For that, first you need to draw a selection around the eyes. After that, select the Lasso Tool from the Toolbar.

Step 3: Draw a selection around the eyes
In this step you have to draw a selection around one of the eyes. You don’t need the entire eye, just the iris in the center. Don’t get anxious if your selection outline isn’t perfect. You can clean things up later. With the one eye selected, press Shift key. You can see a small plus sign ( + ) appears in the lower right of your Lasso Tool cursor. Keep holding the Shift key to add the selection you are about to draw to the selection you have already drawn. Then draw a selection around the other eye. Now both eyes should be selected.
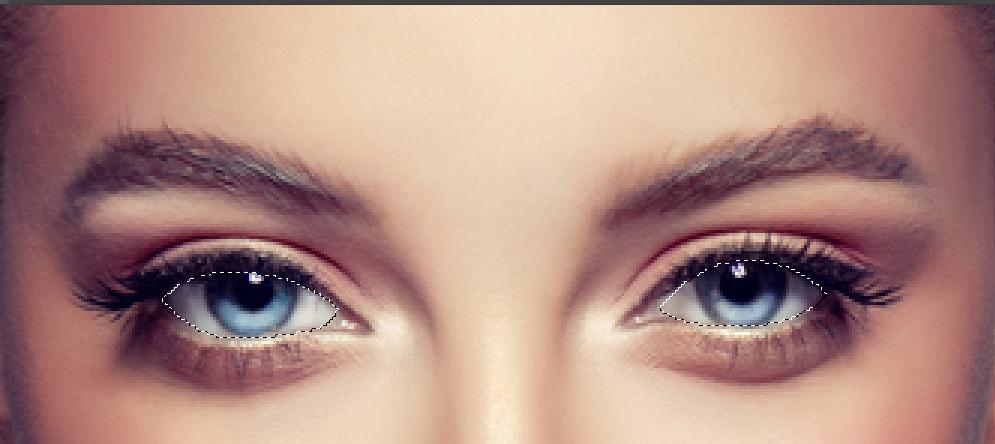
Step 4: Add a hue/saturation adjustment layer
You should use a Hue or Saturation adjustment layer to change the eye color. Click the New Fill or Adjustment Layer icon from the Layers panel. Then choose Hue/Saturation from the list.
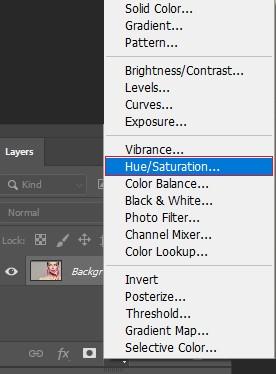
Step 5: Select the colorize option
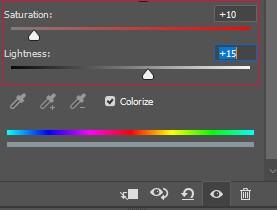
You can find the controls and options for the Hue or Saturation adjustment layer in Photoshop’s Properties panel. Now turn on the colorize option by clicking inside its checkbox. When you select Colorize, the person’s eyes will turn red. If red is not the color you are going for, then learn how to change it with your desired color.
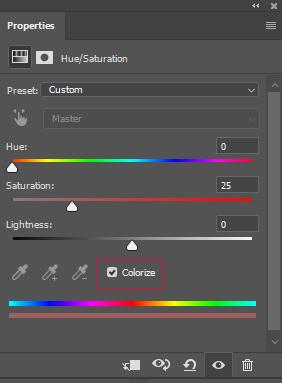
Step 6: Choose new eye color with hue slider
Drag the Hue slider to choose different color for the eyes. Most of us think Hue is the actual color itself. By dragging the slider from left to right cycles you through all the colors of the rainbow and moving from red on the far left to oranges and yellows, greens, blues and so on. Now see the eye color changing in the photo as you drag the slider. If you set your Hue value to around 200 it will be a nice blue. You can choose whichever color you need or you want.
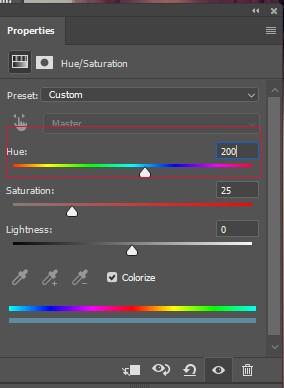
Step 7: Lower the saturation of new color
After you have chosen a new eye color with the Hue slider, it’s time to drag the saturation slider to the left to lower the intensity. Do it till the color looks more natural. You can set a Saturation value of between 10 and 15 which usually works well.
Step 8: Change the blend mode to color
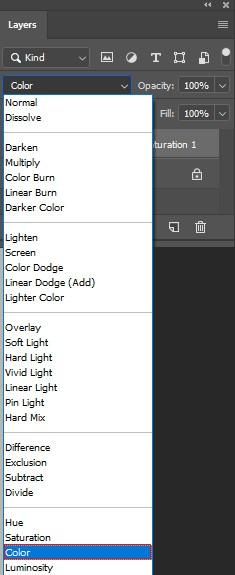
The Hue/Saturation adjustment layer sits above the photo on the Background layer. If you need to change only the color, then change the blend mode from normal to color.
Step 9: Select the layer mask
An amazing feature of adjustment layers in Photoshop is that they include a built-in layer mask. Photoshop used initial Lasso Tool selection to create the mask. You can see the layer mask thumbnail in the Layers panel.
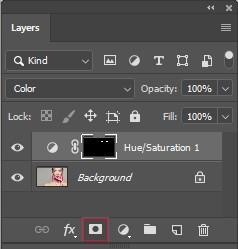
Keep in mind that the thumbnail is filled mostly with black, with just only two tiny areas of white. Here black represents the areas where the Hue or Saturation adjustment layer is having no effect on the picture. That means those areas will show their original color.
Step 10: Select the brush tool
If your initial lasso tool selection was not perfect some of your new color may be extended into the white parts of the eyes, and probably into the eyelids as well. To clean those areas, all you need to do is paint on the layer mask. Now select Photoshop’s Brush Tool.

Step 11: Set your foreground color to black
To hide the color from around the iris, you need to paint with black. Photoshop uses Foreground color as the brush color, and you can see your current Foreground and Background colors in the color swatches near the bottom of the Toolbar. Press letter D on to reset the Foreground and Background colors to their defaults. It will set your Foreground color to white and the Background color to black. Press the letter X on to swap the colors, making your Foreground color black.

Step 12: Paint around the iris
To clean up any problem areas paint around the iris in each eye. You can use a small, soft-edge brush for best results. You can adjust the size of your brush according to your needs from the keyboard by pressing the left bracket key ( [ ) repeatedly to make the brush smaller or press the right third bracket key ( ] ) to make it larger. You can change the hardness of the brush, by pressing and holding Shift while pressing the left bracket key to make the brush edges softer. Hold Shift and press the right bracket key will make the edges harder.
