Ghost mannequin photography, often referred to as invisible mannequin photography, has become a highly sought-after technique in the world of fashion and product photography. This method allows photographers to create compelling images that highlight the details of a garment without the distraction of a model or a traditional mannequin.
The result is a clean, professional look that draws attention to the product itself. Whether you’re an e-commerce entrepreneur, a fashion photographer, or a brand owner, mastering ghost mannequin photography can significantly enhance the visual appeal of your products. This guide will walk you through the essential steps to achieve stunning results.
At its core, ghost mannequin photography involves photographing a garment in such a way that it appears to be worn by an invisible model. The technique emphasizes the product’s shape and design, making it particularly effective for clothing and accessories.
By eliminating the model, the focus shifts entirely to the garment, allowing potential buyers to envision how it will look on them. This approach not only enhances the product’s presentation but also creates a sense of allure and curiosity.
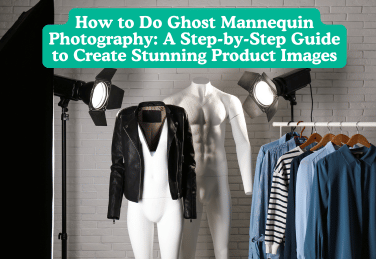
Preparation is key to a successful ghost mannequin shoot. Start by gathering all the necessary equipment, which typically includes a good-quality camera, tripod, lighting equipment, and a backdrop. A plain white background is commonly used to ensure that the focus remains on the garment. Additionally, you’ll need a mannequin that can be disassembled, preferably a ghost mannequin or a flexible dress form that allows you to capture the interior details of the clothing.
Once your equipment is ready, it’s time to prepare the garment. Ensure that it is clean, pressed, and free of any wrinkles or creases that could detract from the overall image. Pay close attention to details such as tags, seams, and logos, as these will be visible in the final product shots. If the garment has any intricate details or unique features, make sure they are positioned prominently when styling the piece on the mannequin.
Lighting plays a crucial role in any photography endeavor, but it is particularly important in ghost mannequin photography. Soft, diffused lighting works best to minimize harsh shadows and create an even light distribution across the garment.
Natural light can be effective, but for consistent results, consider using studio lights or softboxes. Position the lights at angles that illuminate the garment while avoiding direct reflections on shiny fabrics.
It’s also beneficial to have a secondary light source to highlight specific areas of the product, such as embellishments or textures. Experiment with different lighting setups to see what works best for your particular garment. The goal is to create a flattering, professional appearance that showcases the clothing in the best possible light.
With your equipment set up and lighting in place, it’s time to dress the mannequin. Start by putting the garment on the mannequin carefully, ensuring that it hangs properly and maintains its intended shape.
If the garment is loose or flowy, you may need to use pins or clips discreetly to keep it in place and prevent it from sagging. Pay attention to how the fabric falls and adjust as necessary to achieve a flattering silhouette.
For added dimension, consider using additional props such as accessories or undergarments to enhance the appearance of the garment. However, be cautious not to overcrowd the image. The focus should remain on the clothing, so keep additional elements to a minimum and choose items that complement rather than distract.
Once the mannequin is dressed and styled, it’s time to start shooting. Begin by taking a few test shots to assess the lighting, angles, and overall composition.
A tripod is essential to keep your camera steady and ensure consistent framing throughout the shoot. Experiment with different angles and perspectives, such as side views or slightly above the garment, to find the most flattering shot.
Consider taking multiple shots of the garment, focusing on different details such as the neckline, sleeves, and hemline. This variety will provide you with a selection of images to choose from and allows you to highlight various aspects of the product. Don’t forget to take close-ups of unique features like embroidery, buttons, or patterns. These details can make your images more appealing to potential buyers.
After the shoot, the next step is editing the images to achieve the desired professional look. Start by importing your photos into editing software like Adobe Photoshop or Lightroom. The first step is to adjust the exposure, contrast, and color balance to ensure that the images accurately represent the garment. Use cropping tools to eliminate any distractions in the background and focus on the product.
One of the most important aspects of ghost mannequin photography is removing the mannequin from the image. This process can be intricate, but with practice, it becomes easier. Use the selection tool to isolate the garment from the mannequin, and then carefully erase or mask out the mannequin parts. Be mindful of edges and ensure that the contours of the clothing remain smooth and natural-looking. After removing the mannequin, you can refine the background to create a clean, seamless look.
Once the editing is complete, it’s time to add the final touches. This might include adjusting brightness and sharpness to enhance details, applying a soft vignette to draw attention to the garment, or adding a subtle drop shadow to create depth. Depending on your brand’s aesthetic, you may also want to incorporate your logo or watermark into the image for branding purposes.
Before finalizing the images, review them for consistency. Ensure that all the images in a series have a cohesive look, which is crucial for maintaining a professional brand image. This consistency includes lighting, background, and overall editing style. Once satisfied, save your images in the appropriate formats for web use or print, depending on your needs.
Ghost mannequin photography is an invaluable technique for showcasing products in a captivating and professional manner. By following the steps outlined in this guide—from preparation and setup to capturing and editing your images—you can create stunning visuals that not only attract customers but also elevate your brand’s image.
As you practice and refine your technique, remember that patience and experimentation are key. Over time, you’ll develop a unique style that resonates with your audience, ultimately leading to greater engagement and sales. Embrace the art of ghost mannequin photography, and let your products shine in their best light.


