In this Photoshop tutorial, you are going to learn the most essential features in all of Photoshop – layer masks. Before starting, if you are not clear about a layer, you should know this first. Layer masks allow us to monitor a layer’s level of transparency. Actually there is nothing more to them than that. You can also control the transparency level with the Opacity option.But there is a difference between Opacity option and layer masks. Opacity option can change the transparency level for the entire layer at once only. For example if you lower the Opacity level down to, say, 60%, the entire layer becomes 60% transparent. This may be okay for some situations, but what will you do when you want only part of a layer to be transparent? What will happen if you want the left side of the layer to be completely transparent only, and the right side to be completely visible? When you would need to control the transparency of different areas of the layer separately, you need a layer mask.
If you have two photos, in order to blend them together, you can use a layer mask.
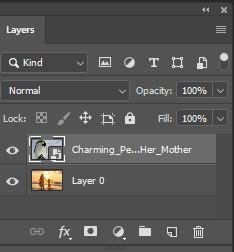
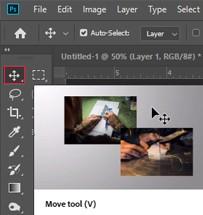
You need to have both images inside the same Photoshop document. Press V on your keyboard to select the Move Tool and then click inside one of the documents and drag that image into the document containing the other image.
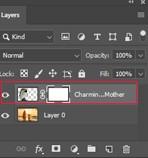
Now you can see both images are in the same Photoshop document, and if you look in the Layers palette, you can see that each one is on its own separate layer.
Basically, layers are pictures put on top of one another. At the point when you add one layer on top of another, the top layer will be on top of the pecking order and the one that is apparent. At the end of the day, in the event that you have three layers, the main blue, the subsequent red and the third (top) is green, the picture you’re taking a gander at is green as it’s the top layer. On the off chance that you delete part of the top layer,
nonetheless, it will start to uncover the layer underneath (red).

Using Layer Masks
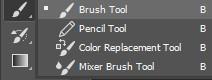
You may not generally need to make changes in accordance with the whole picture. In those situations, Layer Masks end up being one of the genuine advantages of working in Photoshop. The top layer is consistently at the highest point of the pecking order and will disguise the layers underneath. If you need to eliminate an adjustment from a particular area, you can use the erase directly on the layer. But this is not a proper solution. The Layer Mask shows up as a white rectangular box that appears close to the layer in the Layer Panel. Naturally it’s white yet it can address two real colors: Black and White in addition to the shades of gray in between. A white Layer Mask implies that the whole layer/adjustment is visible on top of the layers underneath. A black Layer Mask implies the opposite; the layer and its adjustments are undetectable. To add white or dark to the Layer Mask, the most helpful instrument is the Brush Tool (B).
Select a perfect size, set the brush tone to black, ensure the Layer Mask is chosen (click on it) and paint the areas you would prefer not to be changed with black.
As you can see, the picture itself isn’t turning out black but the adjustment that layer has made is being concealed. it’s just the Layer Mask that’s become black around there.
Here are some of the scenarios where you can use a Layer Mask:
The Challenges of Layer Masks
Despite how helpful Layer Masks will be for your presentation in Photoshop, comprehend that they aren’t perfect right away. Simply painting with a brush on the Layer Mask will be fine in numerous situations yet you’ll before long see that you get a specific measure of haloing and seep on the pictures. Since you’re manually painting on the Mask, it’s not difficult to get somewhat messy and paint marginally over the edge or outside the space you need to uncover or disguise. This frequently turns into an issue later on as it’s an entirely noticeable mix-up. Rather than manually using the brush, I suggest figuring out using Luminosity Masks whenever you have a fundamental comprehension of Photoshop. These are more refined determinations which are committed to keep away from those undesirable errors.
For example when utilizing Luminosity Masks as opposed to manually painting on the Layer Mask is gainful is the point at which you need to make a focus on change. You can adjust the color balance in specific spaces of the picture. You may add a little blue in the haziest shadows. To do this, you need to use the Luminosity Masks to get a particular cover that only focuses on the darkest shadows. You don’t need to stress over brushing excessively far into a more splendid region.
Layers & Layer Masks may be a little confusing if you have just opened Photoshop for the first time. Spend some time playing around with them. You will be used to this and you’re gonna love this feature.


